


— 11 —
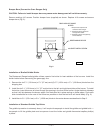
7. Check to ensure that all bricks and burners are secure. Carefully replace the griddle top section. When
replacing griddle top section, be sure that the griddle capillary and bulb(s) are not in a position to be crushed.
Gently pull the griddle capillary towards the front of the range and out from under the griddle area. While two
people (one on each side of the griddle) are lowering the griddle into place, the third person must gently feed
the griddle thermostat bulb(s) through the “V” shield(s) until completely covered. Also ensure that the
capillary is not positioned over the burner flame pattern. Continue to lower the plate into place until it is resting
evenly on top of the range.
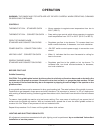
Installation of Hot Top Bricks
The Restaurant Range hot top sections utilize composite/mortar fire bricks for heat distribution of the burners.
Install these bricks before connecting the gas supply line or installing the back riser.
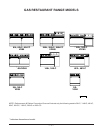
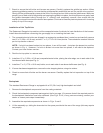
1. The composite/mortar bricks are shipped in a rectangular cardboard box. Locate box and carefully remove
two 10" x 4" (254 x 101.6 mm), and two 7" x 4" (177.8 x 101.6 mm) bricks. There should be one box of bricks
per hot top section ordered.
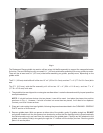
NOTE: If a brick has been broken into two pieces, it can still be used. Just place the pieces into position
as shown in Fig. 4. However, if a brick is broken into more than two pieces, it will need to be replaced.
Contact your local Vulcan servicer.
2. Rest the hot top plate in a secure area.
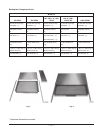
3. Install two 10" x 4" (254 x 101.6 mm) composite/mortar bricks, placing the miter edge, one to each side of the
front burner baffle area (see Fig. 4).
4. Install two 7" x 4" (177.8 x 101.6 mm) bricks, one to each side of rear burner baffle area (see Fig. 4).
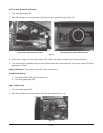
5. If burner has been strapped down, remove the wire strapping device, using wire cutters.
6. Check to ensure that all bricks and the burner are secure. Carefully replace the hot top section on top of the
range.
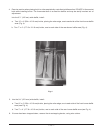
Backsplash
The standard Restaurant Range is equipped with a 23" (58.4 cm) high backsplash and shelf.
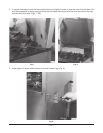
1. Remove the backsplash components from the crating materials.
2. Check the backsplash component parts against the list on page 12 to ensure that all the required parts for
the backsplash installation have been obtained. (See Fig’s. 5 & 6.) If any parts are missing, contact your
dealer or closest parts depot immediately.
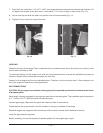
3. Assemble the required components as shown in Fig’s. 5 and 6.
4. Lift the assembly up, sliding the channels into the space provided at the rear of the range (this may require
two people).