


– 5 –
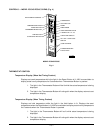
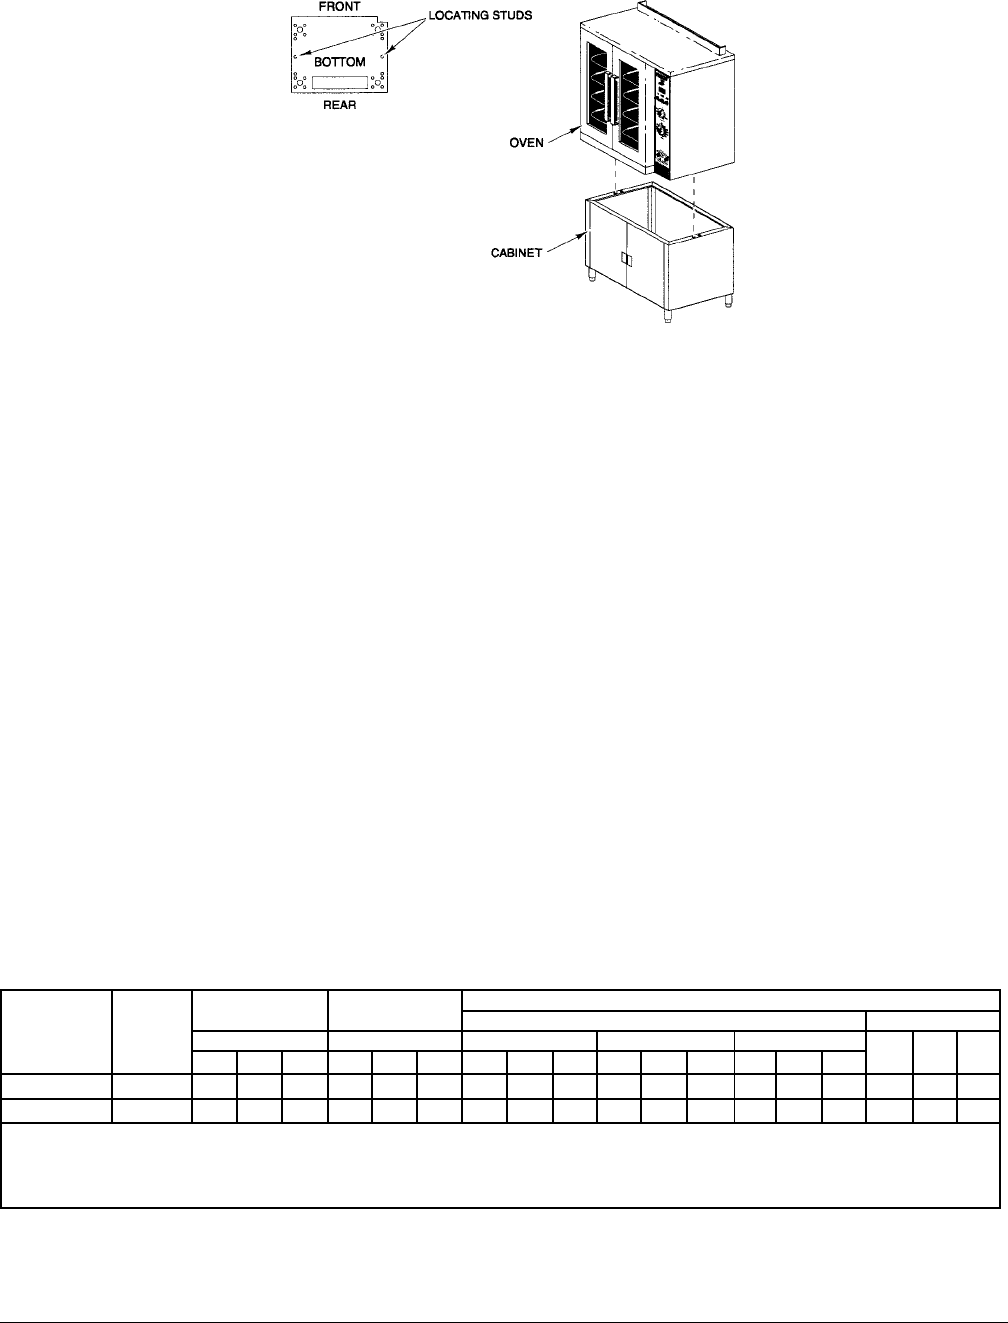
3. Mount the oven on top of the stand or cabinet (Fig. 1).
Assembling the Chimney and Flue Extension
Remove the oven chimney and flue extension from the rear of the oven (motor compartment) and use the screws
provided to fasten the chimney to the top rear of the oven. The flanges on the chimney are to be positioned under
the top cover. Also attach the flue extension.
Electrical Connections
WARNING: ELECTRICAL AND GROUNDING CONNECTIONS MUST COMPLY WITH THE APPLICABLE
PORTIONS OF THE NATIONAL ELECTRICAL CODE ANSI/NFPA70 (LATEST EDITION) AND/OR OTHER
LOCAL ELECTRICAL CODES.
WARNING: DISCONNECT ELECTRICAL POWER SUPPLY AND PLACE A TAG AT THE DISCONNECT
SWITCH TO INDICATE THAT YOU ARE WORKING ON THE CIRCUIT.
Remove the wiring compartment cover on the front of the oven. Remove the appropriate knockout on the bottom
of the oven and attach the power supply conduit to the bottom of the oven.
Comply with the appropriate wiring diagram (included with this manual) when making connections to the
electrical supply lines.
Replace the wiring compartment cover and turn on the power supply.
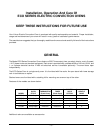
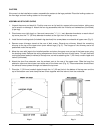
ELECTRICAL DATA
208-240V 480V
NOMINAL AMPERES PER LINE WIRE
TOTAL
3-PHASE LOADING 3-PHASE LOADING
3-PHASE 1-PHASE
KW KW PER PHASE KW PER PHASE 208V 240V 480V
208V 240V 480V
L1-L2 L2-L3 L1-L3 L1-L2 L2-L3 L1-L3
L1 L2 L3 L1 L2 L3 L1 L2 L3
Single Oven 11 3.35 3.35 4.30 3.33 3.33 4.33 32.0 27.9 32.0 27.7 24.2 27.7 13.9 12.0 13.9 52.8 45.8 22.9
Stacked Oven 22 6.70 6.70 8.60 6.66 6.66 8.66 64.0 55.8 64.0 55.4 48.4 55.4 27.8 24.0 27.8 105.6 91.6 45.8
The 208, 240, and 480 volt ovens covered by this manual are for connection to a 1- or 3-phase power system. Ovens leaving the factory are
wired for connection to a 3-phase power system. Wires can be changed at the installation site for connection to a 1-phase power system by altering
the wiring at the terminal block.
LEVELING
Adjust the legs to ensure that the oven racks are level in the final installed position.
Fig. 1