


– 6 –
CASTERS
If the oven is to be installed on casters, assemble the casters to the legs provided. Place the locking casters on
the front legs and non-locking casters on the rear legs.
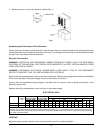
ASSEMBLING STACKED OVENS
1. Unpack the ovens and stack kit. Position one oven on its back for access to the oven bottom, taking care
not to scratch or damage it. Attach the four leg assemblies with the 24 bolts and lockwashers (furnished)
(6 per leg).
2. Place lower oven (with legs) on floor and remove two
7
⁄16" (11.1 mm) diameter knockouts on each side of
top cover plus the 1
3
⁄8" (35 mm) diameter knockout at the right front of the top cover.
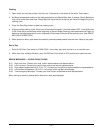
3.
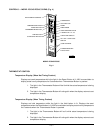
Install the two locating studs (included in leg stack set) into screw plates on underside of upper oven (Fig. 2).
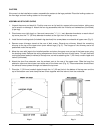
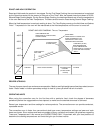
4. Remove oven chimneys stored at the rear of both ovens. Discard one chimney. Attach the remaining
chimney to the top of the upper oven (oven without legs) (Fig. 3). The flanges on the chimney are to be
positioned under the top cover.
5. Move the oven with legs to the installed position and place the upper oven on top of the lower oven using
the locating studs. Remove the wiring compartment cover from the front of both ovens. This will facilitate
routing the power leads (furnished) to the top oven, as well as attaching the 1" (25.4 mm) conduit nipple and
locknut (furnished).
6. Attach the short flue extension over the exhaust vent at the rear of the upper oven. Slide the long flue
extension tube over the exhaust vent at the rear of the lower oven (Fig. 3). These extensions should direct
the exhaust fumes upward through and above the top oven.
7. Place the 1" (25.4 mm) conduit nipple through the 1
3
⁄8" (35 mm) hole in the bottom of the top oven and the
top of the bottom oven and clamp the two ovens together with the locknut from the underside.
Fig. 2
Fig. 3