


– 7 –
Casters
1. Position the pasta cooker in an open space near the final installation area.
2. Tilt pasta cooker on its side. Be careful not to scratch the finish.
3. Thread casters into mounting holes provided on the bottom of the pasta cooker by screwing in a
clockwise rotation until tightened.
4. Carefully raise pasta cooker to its normal position and place it in the installing location.
NOTICE: When the pasta cooker is mounted on casters, it must be installed with the casters supplied,
a connector (not supplied by Vulcan-Hart) complying with either ANSI Z21.69 (latest edition) or CAN/
CGA-6.16 (latest edition), and a quick disconnect device complying with either ANSI Z21.41 (latest
edition) or CAN1-6.9 (latest edition). It must also be installed with restraining means to guard against
transmission of strain to the connector, as specified in the appliance manufacturer's instructions.
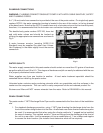
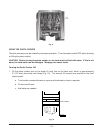
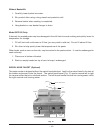
Attach the restraining device at the rear of the oven. (Fig. 1).
Provide a gas line strain relief to limit movement of the pasta cooker without depending on the
connector and any quick-disconnect device or its associated piping to limit the pasta cooker's
movement. Attach the strain relief to the rear of the pasta cooker (Fig. 1).
Should it be necessary to disconnect the gas line strain relief, turn off the gas supply before
disconnection. Reconnect this restraint before turning the gas supply on and returning the pasta
cooker to its installation position.
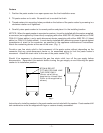
Fig. 1
Instructions for installing casters to the pasta cooker are included with the casters. Pasta cooker/chill
tank combination units are shipped with legs or casters already assembled.
STRAIN RELIEF
FITTING FOR GAS LINE
THIS SIDE ONLY.
(Strain relief fitting
supplied by Vulcan-Hart.
Chain to be supplied by
others.)
PL-51493