


— 13 —
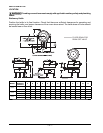
DIRECT STEAM KETTLES
CLEANING
The kettle and its parts are hot. Use care when operating, cleaning or servicing
the kettle.
The kettle interior and exterior should be thoroughly washed after each use when a different food is
to be cooked next or when cooking is completed for the day. If the unit is used continuously through
the day, it should be cleaned and sanitized once every 12 hours.
Empty the kettle. Close draw-off valve and add water to the kettle for cleaning to prevent residue from
drying and sticking to the inside of the kettle.
• Never use harsh or corrosive cleaning chemicals.
• Never scrape the inside of the kettle with abrasive cleansers, metal tools or steel scouring pads,
which will scratch the surface, spoil the appearance and make it more diffi cult to thoroughly clean.
• Add mild, non-chlorine, non-chloride, and non-bleach detergent and scrub the kettle interior
with a nylon brush.
• Loosen stuck-on food by allowing it to soak at a low temperature setting.
• Thoroughly rinse the interior and dry with a soft cloth.
• Rinse the exterior and dry with a soft cloth.
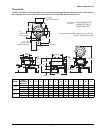
COMPRESSION DRAW-OFF VALVE CLEANING INSTRUCTIONS
Daily After Use
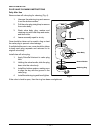
Remove draw-off valve stem assembly for cleaning (Fig. 3).
1. Turn the valve handle counterclockwise until it stops.
2. Pull the valve handle back until it stops.
3. Turn large hex nut counterclockwise until the valve stem assembly is loose.
4. Pull the assembly straight out of the valve body.
5. Remove wing nut and handle. Unscrew valve stem from bonnet.
6. Wash valve body and stem assembly with mild soap and water, and then rinse. Make sure
all food residue is removed from inside valve body.
7. Leave assembly apart to air dry.
Install draw-off valve assembly:
1. Apply PetroGel lubricant to valve stem
threads, “O” ring, rubber plug face and
large hex nut threads.
2. Thread the valve stem into bonnet till
valve stem can be pulled through bonnet.
3. Insert valve stem into valve body.
4. Install large hex nut hand tight.
5. Install valve handle, lock washer and wing nut onto the valve stem.
6. Turn valve handle clockwise until closed. Do not overtighten.
Valve Stem
Fig. 3