


FULL SIZE ELECTRIC CONVECTION OVENS - SERVICE PROCEDURES AND ADJUSTMENTS
F25105 (December 2001) Page 24 of 60
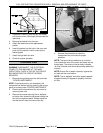
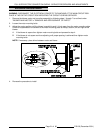
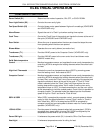
A. Turnbuckles should be 5 to 5 ½ inches
apart.
B. Short eye bolt should be connected to the
end of the chain that goes to the front of
the sprocket.
C. 2 links of the chain should not be engaged
at the rear of the sprocket.
D. Chain must be tight enough that the doors
move simultaneously when opened or
closed.
E. When the doors are opened, the
turnbuckles will move away from each
other.
F. The stop cable must be positioned where it
moves freely and does not get pinched.
3. Position door chain assembly to factory setting
if the conditions in step 2 are not met.
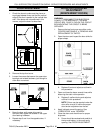
4. If right door does not lead the left door in
closing:
A. Loosen locknuts on both turnbuckles.
B. Loosen left turnbuckle.
C. Tighten right turnbuckle.
D. Tighten locknuts on both turnbuckles.
5. If the right door leads the left door by more
than 3/8 inch:
A. Loosen locknuts on both turnbuckles.
B. Loosen right turnbuckle.
C. Tighten left turnbuckle.
D. Tighten locknuts on both turnbuckles.
6. Check door for proper operation.
NOTE:
The locknuts must be tight during testing or
the adjustment will not hold.
A. If doors do not close properly, repeat step
4, 5 and 6.
B. If doors operate properly, continue to step
7.
7. Install the lower front cover.
COMPUTER CONTROL
Operation
Refer to the Instructions Manual for specific
operating instructions.
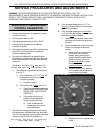
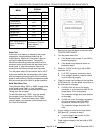
Setup mode
NOTE:
Use the setup mode to verify
that the control
is configured to the factory settings which result in
the proper operation of the oven. If the CAL1
parameter is other than zero, determine if it is still
needed before resetting to zero. See "COMPUTER
CONTROL TEMPERATURE CALIBRATION".
CAUTION: Changing the C_F, InP1, rL1 & rH1
parameters will default all
menus to the factory
settings.
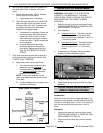
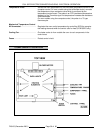
1. Use this key sequence to access the setup
mode.
Up arrow; Rack 1; Temperature; Temperature;
Down arrow; Rack 1
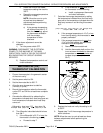
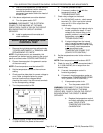
2. Once in the setup mode the display will
alternate between the parameter and
programmed data.
• To change data to the factory setting, use
the arrow keys.
• To select the next parameter, press the
Rack 1 key.
• After the last Parameter and Data is
viewed, press the Rack 1 key a final time
to exit the setup mode and return to
operations mode. The current set point
temperature will be displayed.
• After 1 minute of no key activations, the
control will return to operation mode.
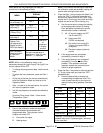
3. Listed are the parameters and data you should
find.