VPX SERIES STEAMER - ELECTRICAL OPERATION
F25111 (March 2002)
Page 15 of 20
SEQUENCE OF OPERATION
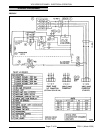
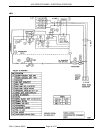
Wiring diagram 7264 will be used to explain the
electrical sequence of operation.
Timed Cooking Mode
1. Conditions.
A. Steamer connected to correct voltage and
is properly grounded.
B. Cooking mode switch (power) off.
C. High limit thermostat closed.
D. Standby thermostat closed.
E. Temperature control is setup properly and
is ready to use.
F. Door closed (door switch closed).
G. Timer "off".
H. Cooking compartment filled to the water
level mark and below standby temperature
of 168°F (+5/-8).
NOTE:
At temperatures below 168°F, the steamer
is in a "pre-heat" state.
2. Select "timed" on the cooking mode switch.
A. Internal "pilot" light (top, amber) comes
on.
B. Internal "pilot" light (bottom, red) comes
on.
C. Relay "R1" energized.
1) R1-2A & R1-2B (both N.C.) open.
2) R1-3A & R1-3B (both N.O.) close.
3. Temperature control energized and evaluates
input from thermocouple.
A. With temperature below set point, internal
relay contacts close.
1) Heater light (green) comes on.
2) Contactor energized and heating
elements are powered.
4. Temperature reaches 168°F and standby
thermostat opens.
A. Internal "pilot" light (top, amber) goes out.
NOTE:
Steamer will maintain standby
temperature until a "cook" time is dialed on
timer; or the cooking mode switch is turned to
off or continuous; or the door is opened.
B. Relay "R1" de-energized.
1) R1-2A & R1-2B return to N.C.
position.
2) R1-3A & R1-3B return to N.O.
position.
a. Temperature control de-
energized and internal relay
contacts open.
a) Contactor de-energized and
power removed from heating
elements.
5. Set "cook" timer to desired time.
A. Timer contacts 1 & 3 close, timer motor is
energized and timing down begins.
NOTE:
Additional time can be set or the "cook"
timer can be turned off throughout the cooking
cycle. If turned to off, steamer reverts to
standby temperature.
6. Temperature reaches set point and the
temperature control’s internal relay contacts
open.
A. Contactor de-energized and power is
removed from heating elements.
7. Steamer cycles on the temperature control until
"cook" time expires.
8. Time expires on "cook" timer.
A. Timer contacts 1 & 3 open, timer motor is
de-energized and timing stops.
B. Timer contacts 1 & 4 close.
1) Buzzer energized and sounds.
NOTE:
The buzzer continues to sound
until timer dial is set to off position or
additional time is set.
9. Turn "cook" timer off.
A. Steamer reverts to standby temperature
and continues to cycle until a "cook" time
is dialed on timer; or the cooking mode
switch is turned to off or continuous; or the
door is opened.
NOTE:
If water level becomes low during
cycling, high limit thermostat will open and low
water light (red) will come on.
Continuous Cooking Mode
1. Conditions.
A. Steamer connected to correct voltage and
is properly grounded.
B. Cooking mode switch (power) off.
C. High limit thermostat closed.
D. Standby thermostat closed.
E. Temperature control is setup properly and
is ready to use.


