


Switch off the Quick Freeze function when the tem-
perature in the freezer is a constant 18
o
C or colder.
Switch off the refrigerator/freezer by pressing the
Unplug the mains lead from the wall socket.
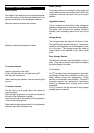
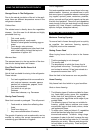
Using a philip’s head screw driver, unscrew the bulb
cover (See Fig.)
Replace the bulb with a new one (max 10W, 12V,
halogen base G4)
Replace the bulb cover
Connect the power supply
Restart the refrigerator/freezer by pressing the
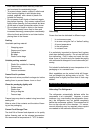
It is possible to change the door hinges form right
hinged to left hinged or vice versa.
The refrigerator/freezer must be switched off,
unplugged from the wall socket and emptied
completely.
* Remove the two screws in the hinge top on the
right hand side of the cabinet (13).
* Lift the freezer door slightly and take the door
and upper hinge off by pulling the door towards
you.
* Remove the dummy hinge from the opposite
side by unscrewing the two screws (14).
* Reverse the dummy hinge and refit it on the
opposite side of the cabinet using two screws.
* Tilt the refrigerator to an angle of maximum 45
o
and unscrew the bottom hinge. This is done by
removing the two screws holding the bottom
hinge on the cabinet underside (15).
* Remove the bottom dummy hinge in the oppo-
site side in the same way as the upper dummy
hinge was removed (16).
* Reverse the dummy hinge and refit it on the
opposite side of the cabinet.
CHANGING THE DOOR HINGES
REPLACING THE LIGHT BULB
* Reverse the upper right hand hinge and refit it in
the lower left hand corner of the cabinet.
* Place the cabinet in the vertical position again.
* Dismount he door handle by removing the
screws (17).
* Reverse the lower right hand hinge and refit it on
the top part of the door in the left side of the cab-
inet. Push the door into position and slide the
upper hinge into the upper left hand hinge cas-
ing. Tighten the two screws. Remember to
adjust the hinges.
* Remove the screw on the right hand side of the
door and screw them onto the left side of the
door. Use the screws from the left side to attach
the handles to the right hand edge of the doors
(18).
13
buttons (1), (2).
ON/OFF
buttons (1), (2).
ON/OFF