


-- 4 --
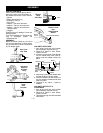
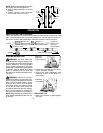
Elbow
Key
Slot
Spacer
Ring
Clamp Ring
4. Align key with slot and insert elbow
into blower outlet.
5. Securely tightenthe clamp byturning
the knob.
6. Proceed to
ALL UNITS -- TUBE AS-
SEMBLY
.
ELECTRIC UNITS WITH THREADS
1. Stop the motor, disconnect power
source, and wait until impeller has
completely stopped turning.
2. Remove all tubes or other attach-
ments from unit.
3. Remove spacer ring from elbow.
4. Thread the small end of the elbow
into the blower outlet until the elbow
stop is about 3/8 inch from blower
outlet.
5. Proceed to
ALL UNITS -- TUBE AS-
SEMBLY
.
ELECTRIC UNITS WITH TABS
1. Stop the motor, disconnect power
source, and wait until impeller has
completely stopped turning.
2. Remove all tubes or other attach-
ments from unit.
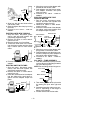
3. Insert the notched end ofthe adapter
into the elbow tube; push parts to-
gether until the adapter snaps into
place.
Groove
Tab
Notched
End
4. Align thegrooves on the adapterwith
the tabs on the blower outlet.
5. Push adapter onto the blower outlet;
turn adapter clockwise until parts
snap into place.
6. Proceed to
ALL UNITS -- TUBE AS-
SEMBLY
.
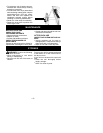
ELECTRIC UNITS WITH TUBE
RELEASE BUTTON
1. Stop the motor, disconnect power
source, and wait until impeller has
completely stopped turning.
2. Remove all tubes or other attach-
ments from unit.
3. Insert the notched end ofthe adapter
into elbow; push parts together until
the adapter snaps into place.
Elbow
Notched End
Hole for
tube release
button
Blower Outlet
Adapter
Tube Release
Button
4. Align thegrooves on the adapterwith
the grooves on the blower outlet.
5. Pushtheadapteronto theblowerout -
let until it snaps into place (adapter is
secured by tube release button).
6. Proceed to
ALL UNITS -- TUBE AS-
SEMBLY
.
ALL UNITS -- TUBE ASSEMBLY
1. Push the slotted end of the pivot tube
over the e lbow until the flange bottoms
out in the elbow groove.
NOTE: Besure flange snaps into groove.
Flange
Elbow
Pivot Tube
Elbow Groove
2. Test rotating action of the pivot tube
by rotating the pivot tube right and
left.
3. Assemble extension tubes upto a to-
tal of 4, depending on the height of
gutter to be cleaned.
4. Thread nozzle onto the last tube.