


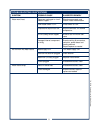


SERVICING INSTRUCTIONS (continued)
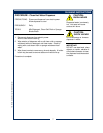
IMPORTANT:
When replacing heating
element, also replace seal
gaskets.
NOTE: Any abrasion or
roughness on the flat end of the
seat cup will require replacing
the seat cup:
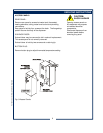
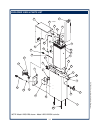
REPLACE HEATING ELEMENT
Remove tank lid assembly as detailed on page 10.
Remove two hex nuts holding element to cover. Pull element
from mounting holes.
Reassemble in reverse order.
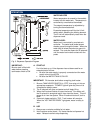
REPLACE SOLENOID
Unplug power cord. Turn OFF and disconnect water supply from
dispenser inlet fitting.
Remove rear panel. Remove two screws holding access door in
place. Remove access door and solenoid. Unscrew inlet fitting
cap to release solenoid from door. Remove wiring from solenoid.
Transfer fill tube from old solenoid to new solenoid.
Reassemble in reverse order.
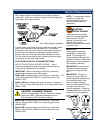
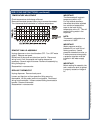
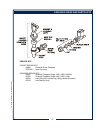
REPAIR HOT WATER FAUCET
Unplug power cord. Turn OFF water. Unscrew bonnet from
faucet, then pull bonnet assembly from faucet body.
Examine the interior of the faucet body and the surface of the
seat cup. Clean out any debris in the faucet body, using a stiff
bristle brush if necessary.
If required, work the seat cup out of the bonnet and off of the end
of the stem. Install a new seat cup, making sure the knob on the
stem is fully inserted into the pocket of the seat cup, and the skirt
of the seat cup is fully inserted into the bonnet
Reassemble in reverse order.
11
712 76580 Owners Manual Hot Water Dispenser