


3
When done, 0:00 will appear in display and audible alert will sound. Turn bread maker off by holding START/STOP
button down until red ON light goes out, about 3 seconds. Unlock pan using hot pads or oven mitt and shake bread out of
pan. Cool on rack 15 to 30 minutes before slicing. See “Clean After Each Use” section in this book for cleaning pan and
knead bar.
‘QUICK START’ STEPS FOR MAKING A RECIPE IN THIS BOOK - Choose one of the many bread
recipes included in this book and follow the basic steps that follow. Either a 1 or 1½ pound loaf of bread can be made
depending on the size loaf desired.
Wash pan and knead bar as recommended in “Clean Before Using” section in this book and be sure knead bar is positioned
on shaft in bottom of pan.
1. Read “How To Measure” section in this booklet, as this is VERY IMPORTANT.
2. Add all liquid ingredients to pan first, then add dry ingredients, leveling and pushing some of the dry ingredients into
the corners. Add the recommended amount of butter or margarine to corners of pan.
3. Make a well in center of dry ingredients and add the recommended amount of yeast for the type being used and loaf
size.
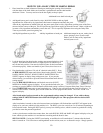
4. Lock pan into bread maker, turning counterclockwise (see LOCK directional arrow on edge of pan). Plug bread maker
into outlet and press Bread Select button until recommended bread setting, as given in recipe, appears in display. Press
Bread Color button until desired crust color, LIGHT, MEDIUM, or DARK, appears in display. Press START/STOP
button to turn on. Red ON light will glow, colon between hours and minutes will flash and time will count down in
minutes so you always know how much time remains until the bread is done.
When done, 0:00 will appear in display and audible alert will sound. Turn bread maker off by holding START/STOP
button down until red ON light goes out, about 3 seconds. Unlock pan using hot pads or oven mitt and shake bread out
of pan. Cool on rack 15 to 30 minutes before slicing. See “Clean After Each Use” section in this book for cleaning pan
and knead bar.
OTHER TIPS TO KEEP IN MIND WHEN USING YOUR BREAD MAKER
1. DO NOT REMOVE the bread pan or touch any moving parts when bread maker is in operation. If you need to stop the
bread maker during operation, hold the START/STOP button down for 3 seconds or until red ON light goes out.
2. BE SURE to allow adequate ventilation around the bread maker when it is in operation. Keep it out of drafts and direct
sunlight and at least 4 inches away from walls, cabinets and other appliances, especially heating and cooling appliances
which can interfere with the internal bread maker temperatures and affect the loaf of bread being prepared.
3. DO NOT IMMERSE base of bread pan in water or other liquid as this can damage the bearing on the bottom of the pan
that turns the knead bar.
4. ALWAYS place bread maker on a DRY, STABLE, heat-proof countertop or table during use. Since the bread maker
contains a motor, some vibration occurs during the knead cycle.
5. AVOID touching bread maker during the bake cycle as exterior surfaces become hot. ALWAYS use pot holders when
removing and handling the bread pan after baking.
6. FOLLOW instructions as given for best results. THE MOST IMPORTANT STEP IN BREAD MAKING IS TO
MEASURE INGREDIENTS ACCURATELY.
7. DO NOT EXCEED the ingredient capacity of the bread maker. See “Know Your Ingredients” section in this booklet.
Use only fresh ingredients.
8. ALWAYS ADD INGREDIENTS in the order listed in the recipes. Add liquid ingredients to the bread pan first,
followed by dry ingredients, then butter or margarine and finally the yeast in the very center. Before adding the yeast,
ALWAYS tap the pan to settle the dry ingredients, then level off the ingredients, pushing into the corners to prevent liquid
from seeping up. Then add the yeast to the very center of the pan, making a slight well in the center of the dry ingredients.
This sequence is very important, especially when using the delay start timer of your bread maker to prevent over
fermentation of the yeast.
9. IN THE EVENT OF A POWER OUTAGE, the bread maker will turn off automatically and remain off when power is
restored. If this occurs, you will need to remove the contents from the bread pan and start over using fresh ingredients. The
red ON light will go off in the display to let you know the bread maker is not in operation
10. DO NOT COVER bread maker with anything during operation as this can cause malfunction
.
11. DO NOT TOUCH control panel buttons after bread maker has been turned ON as this will interrupt the cycle. Turn
bread maker OFF after completion of cycle.
12. DO NOT LEAVE bread maker plugged into electrical outlet when not in use to prevent it from being accidentally
turned ON.