


6
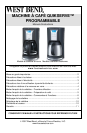
USING YOUR COFFEEMAKER – CONTROLS AND FEATURES
There are five push buttons: PROG/AUTO, ON/OFF, HOUR, MIN, and AROMA
There are two indicator lights: PROG/AUTO and ON/OFF
The LCD display has six indicator icons plus the CLOCK display: AM, PM, BREW,
AROMA, AUTO, and CLEAN
Programming Function: Depending on the model of coffeemaker there are up to
three functions, which are user programmable.
1. Drip Coffee Auto-Brew Start Time Setting
2. Keep Warm Hours Setting – 1 to 5 hours (
Glass carafe version only)
3. 24hr Clock Setting
Note: There are two basic models available; Glass carafe model or Thermal carafe
model. The Glass carafe model includes a programmable keep warm time. The
Thermal carafe model turns off immediately after completion of the brew cycle, as
there is no need for the keep warm function with the thermal carafe.
SELECTING FUNCTION TO PROGRAM
To enter the programming mode: Press and hold the PROG/AUTO button for 3-
seconds. The PROG/AUTO indicator light will be flashing to indicate you are in
programming mode. Each press of the PROG/AUTO button will alternatively select
between programming the Drip Coffee Auto-Brew Time setting function, the Keep
Warm Hours setting function (if applicable), the 24hr Clock setting function or exit the
programming function. You can repeat the cycle on subsequent 3-second pressing
of the PROG/AUTO button.
Note: While in programming mode, the PROG/AUTO indicator light will be flashing.
In the event of a delay of 10 seconds between any button, the control will
automatically exit the programming function retaining the last displayed values and
the PROG/AUTO indicator light will go off.
PROGRAMMING THE DRIP COFFEE AUTO-BREW TIME SETTING FUNCTION
Press and hold the PROG/AUTO button for 3-seconds to select the Drip Coffee
Auto-Brew Time setting function. The PROG/AUTO indicator light, the Auto LCD
icon and the CLOCK display will all be flashing. Note: The default value in the
CLOCK display will be the last programmed Drip Coffee Auto-Brew Time setting. If
the desired time is displayed, press PROG/AUTO to confirm and set or each
pressing of the HOUR or MINUTE button will adjust the time setting (and alternate
between the display of AM or PM at each passing of 12:00). Note: Ensure the
desired AM or PM LCD is displayed. If the alternate is displayed, continue to press
the HOUR button until the desired hour and AM or PM LCD icon is displayed.
Pressing the PROG/AUTO button will confirm and set the displayed Auto-Brew time
including AM or PM setting. The PROG/AUTO indicator light and the 1-digit keep
warm hour will be flashing (second digit from the left in CLOCK display). Note: The
default value will be the last programmed Keep Warm Hours setting; 1, 2, 3, 4, or 5
hours.