


4
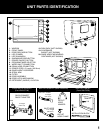
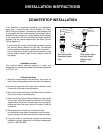
Outlet
Hose Hanger
Floor Standpipe Drain
Standpipe
Sink Drain W/ "Y" Branch Tailpiece
Sink
WATER DRAINAGE OPTIONS
3-Prong
Electrical
Installation Block
Drain
Connection
Supply
Connection
Trim Kit
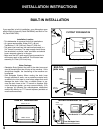
BUILT-IN
(side view)
Dishwasher
Opening: Min. 23" Wide
Electrical
Water
Outlet
Water
Inlet
Min.
21-3/4"
Deep
Water
Supply
CUTOUT FOR BUILT-IN
Opening:
Min. 18-7/8" High
TRIM KIT DIMENSIONS
If you specifi ed a built-in installation, your dishwasher came
with the Built-In Hose Kit (Part# DWVBIHK) and Built-In Trim
Kit (Part# DWVTKBL).
Installation Location
- This dishwasher is approved for built-in installations.
- Air space requirements: Sides=3/16” (.48 cm),
Top/Bottom=1-1/8” (2.86 cm), Rear=2” (5.08 cm)
- The water inlet hose from the machine terminates in a
3/4” “female” connector. The water supply should there-
fore terminate in a similar “male” connector and should
have a stopcock close by in the pipe.
- Make sure the HOT water supply faucet connection is
within easy reach of the machine. The fi ll-drain hose
assembly is 5 Feet (152.4 cm) long.
Water Drainage
- Standpipe Drain System: No point of the drain hose must
ever be placed higher than the top of the machine. If this
should ever happen, the functioning of the machine can
be affected.
- Sink Drainpipe System: When routing the drain hose
through cabinets or walls, use a protective material such
as electrical or duct tape to cover sharp edges that could
damage the drain hose. Use a suitable clamp to se-
cure the drain hose to the “Y” branch or disposer. With
a sink drainpipe system, you may connect directly: 1) To
a disposer by following the manufacturers attachment
method. 2) directly to a “Y” branch tailpiece (available at
most hardware stores).
BUILT-IN INSTALLATION
INSTALLATION INSTRUCTIONS
Width: 25 1/8”
Width: 22 5/8”
Height: 20 1/2”
Height: 17 3/8”
vesta_dwv303b.indd Sec1:4 11/9/2005 8:32:29 AM