


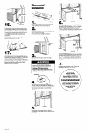


Venting
requirements
round ductwork
Now start...
With range hood in kitchen.
elbow
3-l/4” x 10” to round
ductwork transition
Property Damage
l
Slide cardboard or hardboard under
range before moving range across floor.
Failure to do so could cause damage to
floor covering.
l
Cover countertop, cooktop or set-in
range with a thick, protective covering.
Failure to do so may result in property
damage.
Fire Hazard
l
Terminate venting system to outside.
. Do Not terminate the vent in an atlic or
other enclosed space.
Failure to follow these instructions could
result in a fire.
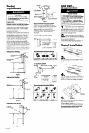
Figure 4
Recommended ductwork length
Use 3- l/4” x lo” or 7” ductwork with a
maximum length of 26 feet for ductwork
system. For best performance, use no more
than three 90” elbows. To calculate the
length of system you need, add the
equivalent feet for each ductwork piece
used in the system. See the following
examples.
Ductwork needed for installation is not
included. If roof or wall cap has a damper,
Do Not use damper supplied with hood.
Determine which outside venting method
needs to be used. NOTE: If a non-vented
(recirculating) installation is desired, follow
instructions on Panel D.
The length of the ductwork and number of
elbows should be kept to a minimum to
provide efficient performance. The size of
the ductwork should be uniform. Do Not
install two elbows together. Use duct tape
to seal all joints in the ductwork system.
Ductwork can terminate either through the
roof or wall. Use caulking to seal exterior
wall or roof opening around exhaust hood.
For the most efficient and quiet operation, it
is recommended that the range be vented
vertically through the roof through 7” round
ductwork.
Figures l-4 show common venting methods
and what types of materials are needed.
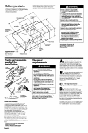
1
Disconnect and move freestanding
n range from cabinet opening to
provide easier access to upper cabinet and
rear wall. Put a thick protective covering
over cooktop, set-in range or countertop to
protect from damage or dirt.
2
Determine which venting method
I (roof or wall venting or non-venting)
you need to use. This range hood is shipped
for non-vented installation.
If non-venting (recirculating) installation is
desired, follow instructions on Panel D.
3- l/4” x lo” ductwork system
+- 6 ft. 4
I lb--
wall cap
Vented installation
I
Length of
3-1/4”xl0”system = 13ft
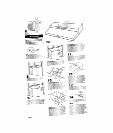
Recommended standard fittings
Vertical Roof Venting
roof coo
7” round
through the
roof -
I
-
3-114” x IQ” 90”
3-l/4” x IO” flat
I
3-114” x 10” wall
elbow = 5 ft.
elbow = 12 ft.
cap=oft.
I
damper located
as far from hood
as possible
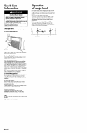
Remove screws from vent baffle on top of
range hood. Remove vent baffle.
7” ductwork system
-
4.
Figure 1
Vertical Roof Venting
1
roof cap
3-l/Lx lo”
to 7”
transition
Maximum length
1 - transition
2 - 90” elbows
= 26 feet
= 4.5ft.
=lO ft.
Turn vent baffle and reinsert in slot in top of
range hood so that the word “Vented” is
facing up, Fasten vent baffle with screws.
8 feet straight
= 8 ft.
l-
wall cap
= 0 ft.
Length of 7” system = 22.5 ft.
Recommended standard fittings
3-114” x 10”
through the roof
lo”
knockouts
knockouts
Figure 2
1
Remove knockout from the wiring opening
(top or rear) to be used.
For rectangular venting, remove only the
3-l /4” x 10” rectangular opening knockout.
For round ductwork venting through roof,
remove both opening knockouts.
Horizontal Wall Venting
Figure 3 ’
Panel B