


j equally
space*
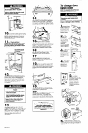
Product Damage
Do Not solder within 6” of plastic
water inlet valves.
Failure to follow this instruction could
result in product damage.
IO
n
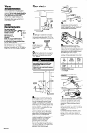
Connect water pipe or tubing
directly to water inlet valve. Do Not run
pipe or tubing across front of motor or
dishwasher legs. Turn on water supply
and check for leaks.
11
n
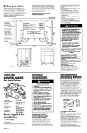
Check electrical
requirements. Be sure you have correct
electrical supply and recommended
grounding method. See Panels A and B
for proper connection.
top mounting brackets
attached to underside
of countertop.
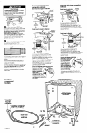
12
w Open dishwasher door and
remove ail shipping materials. Remove
bottom rack. Place a newspaper or
large sheet of paper over bottom of
dishwasher to protect the pump area
when securing dishwasher to
countertop.
Personal Injury/Product Damage
Hazard
l
The dishwasher must be secured to
the countertop to keep it from tilting
when door is open.
l
Do Not drop screws in dishwasher
~
tub. If screws should fall into pump,
pump and motor damage may
occur.
Failure to follow these instructions
may result in personal injury or
product damage.
13
n
Secure dishwasher to
countertop with two, NO. -10 x l/2”
Phillips-head screws from parts bag. You
MUST
secure dishwasher to keep it from
tilting when door is opened or closed.
Do Not drop screws in dishwasher tub.
Remove paper from bottom of
dishwasher.
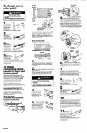
14
w Open door approximately 3”
and check for equal spacing between
inner door and tub sides. If necessary,
loosen screws that fasten dishwasher to
countertop and shift tub. Tighten screws.
operation. Door should
close
easily
without slamming and open with its own
weight. If necessary, close door and
adjust both door springs by moving
spring ends to different holes in base.
16
n
Take a few minutes to read
the Use and Care Guide to fully
understand your new dishwasher.
17
n
Check that all parts have
been installed and no steps were
skipped. Check that you have all the
tools you started with.
18
w Turn on electric supply. Start
dishwasher and allow it to complete a
cycle. Check that dishwasher is working
properly and that there are no water
leaks.
19
w Replace the access panel
and toe panel. The toe panel must be
positioned to contact floor.
20
w If chanainq color of door and
access panel or instairing custom
panels, follow the “To change door
panel color” and ‘To change access
panel color” instructions, Panel D and E.
Congratulations!
You have just finished installing
your new undercoun ter
dish washer. Keep Installation
instructions available for easy
reference.
To change door
panel color
NOTE: The opposite side of the door
color panel is a different color.
Personal Injury Hazard
Wear gloves and handle panels
carefully.
Cut metal edges may cause personal
iniurv or damage to other materials.
1
n
Insert finaer
under one end-of
retainer and pull
towards you in a
peeling action. Set
retainer aside.
2
Lift
l
door
panel(s) at
outer edges.
Use one hand
to bow bottom
of panel(s).
Remove
panel(s).
Do Not
remove spacer.
3
Insert one
n
side of
door panel(s).
with desired color
facing out, into
one side of door
frame.
4
Bow door
n
panel(s)
and insert other
side of door
panel(s) into
door frame.
control console
5
Push in
n
on door
panel(s) near the top
and slide panel(s) and
spacer up inside
bottom of control
console, allowing
panel(s) to rest on
channel at bottom
of doors.
6
Snap one end of retainer into
W channel as shown, Push inward
while sliding thumb along full length of
retainer.
Panel D