


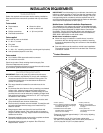

5
Countertop Preparation
The cooktop sides of the drop-in range fit over the cutout edge of
your countertop.
If you have a square finish (flat) countertop and the opening width
is 30" (76.2 cm), no countertop preparation is required.
Formed front-edged countertops must have molded edge
shaved flat ³⁄₈" (1.0 cm) from each front corner of opening.
Tile countertops may need trim cut back ³⁄₈" (1.0 cm) from each
front corner and/or rounded edge flattened.
If countertop opening width is greater than 30" (76.2 cm), adjust
the ³⁄₈" (1.0 cm) dimension.
Countertop must be level. Check levelness by placing level on
countertop, first side to side, then front to back.
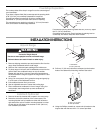
INSTALLATION INSTRUCTIONS
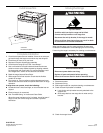
Unpack Range
1. Remove shipping materials, tape and protective film from the
range. Keep cardboard bottom under range.
2. Remove oven racks and parts package from inside oven.
3. To place range on its back, take 4 cardboard corners from the
carton. Stack one cardboard corner on top of another.
Repeat with the other 2 corners. Place them lengthwise on
the floor behind the range to support the range when it is laid
on its back.
4. Using 2 or more people, firmly grasp the range and gently lay
it on its back on the cardboard corners.
5. Pull cardboard bottom firmly to remove.
6. Use an adjustable wrench to loosen the leveling legs.
7. Place cardboard or hardboard in front of range. Using 2 or
more people, stand range back up onto cardboard or
hardboard.
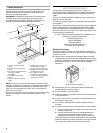
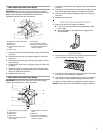
Install Anti-Tip Bracket
1. Remove the anti-tip bracket that is taped in the oven cavity.
2. Determine and mark centerline of the cutout space. The
mounting bracket can be installed on either the left side or
right side of the cutout. Position mounting bracket in cutout
so that right (or left) edge of the bracket is 13¾" (34.9 cm)
from centerline, as shown.
3. Drill two ¹⁄₈" (3.0 mm) holes that correspond to the bracket
holes of the determined mounting method. See below.
4. Using the Phillips screwdriver, mount anti-tip bracket to the
support slat with the two #12 x 1⁵⁄₈" screws provided.
30"
(76.2 cm)
30 ¾"
(78.1 cm)
³⁄₈"
(1.0 cm)
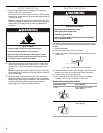
WARNING
Excessive Weight Hazard
Use two or more people to move and install range.
Failure to do so can result in back or other injury.
A. Centerline
B. 13¾" (34.9 cm)
A. #12 x 1⁵⁄₈" screws
B. Anti-tip bracket
A
B
A
B