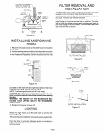
CAUTION: If two studs are not located on the line drawn
(Figure 5). DO NOT attempt to install the hood.
NOTE: If the shelf hood is to be installed above a
Freestanding Range, disconnect the power from the range
and move the range out of the opening in the cabinets. This
will allow for more access to the installation area.
If installing the shelf hood above aBuilt-in Cooktop orSet-in
Range, lay a protective cover over the cooktop during the
installation. This may help prevent damage to the cooktop
(in case you drop something) and it will prevent dust and dirt
from accumulating on the cooktop during installation.
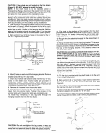
4. Line the top of the hanging bracket up with the line drawn
on the wall in Figure 5. Move the bracket to the left or right
within the allotted 30” space until the center line of the 2
studs line up with 4 holes in the hanging bracket. Neither
edge of the bracket should be closer than %” to the side
cabinets or the end of the 30” allotted space. (See Figure 6).
5. Mark and drill four 3/16 dia. holes in the studs for the l/4”
dia. X 2” lage bolts provided.
I
II II
CLEARANCE
TO CABINET
Figure 6
6. Mark 2 holes on each end of the hanging bracket. Remove
bracket and drill four %‘I dia. holes.
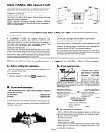
7. Insert four hollow wall anchor bolts into the four 3/s” dia.
holes in the sheet rock. Anchor bolts are provided in
installation pack. Rotate anchor bolts screws 5-10
revolutions to hold each anchor bolt in place. These will be
completely tightened later. (See Figure 7).
6. Remove all 4 screws from the anchor bolts.
9. Attach hanging bracket to the wall with the four screws
taken from the anchor bolts. Tighten the screws in the
anchor bolts until the anchor bolts are completely set.
10. Install four remaining Vi” dia. lag bolts through the
hanging bracket and into the two studs.
HOLLOW WALL
ANCHOR BOLT
Figure 7
CAUTION: Do not overtighten the lag screws. If they are
overtightened, the bracket may pull into the wall material
which will not allow the shelf to slide into place properly.
:,:
Figure 6
11. The hole in the bottom of the cabinet (for the duct
provided with the hood) should be cut as shown in Figure 6
(15%” long by 1%” deep). Hole must be cut to back wall.
Make sure to center the hole within the 30” alloted space.
12 Rough wire the electrical supply to the area shown in
Figure 5.
13 Hang the shelf hood on the hanging bracket. To be sure
the shelf hood hanging angle is completely engaged in the
hanging bracket, measure from the top of the shelf hood to
the top of the hangrng bracket. This distance shoud be
l-7/16 on both sides.
CAUTION: Do not continue until both ends measure l-7/16”.
If the hanging angle is not fully engaged in the hanging
bracket, the shelf hood will not be level and the hood may
become dislodged from the hanging bracket. This could
cause damage.
14. If your micro shelf hood is located between cabinets, you
can fasten theside panels to the cabinets. To do this, remove
the two #0x%” slotted round head screws from the
installation assembly. Locate the 3/16” diameter holes on
either side of the hood (eleven inches from the rear and one
inch from the bottom). Securely fasten both sides of the
hood to the cabinets.
15. Complete the duct work by:
A. Fit the duct provided with the shelf hood on to the vent
outlet of the shelf hood.
B. Mark and drill (2) ‘/a” dial holes (1 each side) to fasten the
thin duct provided with the hood to the back wall. See
Figure 9.
C. Use 2 #6 xl/g long screws provided with the unit to fasten
the narrow thin duct to the shelf.
D. Next install the transition adaptor to the thin duct. This
transition adaptor will accept 3%” X 10” duct.
E. Completethe %“XlO”duct(orequilvalent) totheoutside
using the guidelines listed under venhng requirements.
\- ,
Fig&e
Page 3


