


13
To Replace the Crisper(s) Cover:
NOTE: Before reinstalling the cover, make sure the U-shaped
reinforcement bar is reinstalled in the front edge of the crisper
cover.
1. Fit back of cover frame into supports on side walls of the
refrigerator and lower the front of the cover frame into place.
2. Slide rear of glass insert into cover frame and lower front into
place.
Meat Drawer Cover
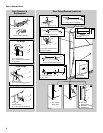
To Remove and Replace the Meat Drawer Cover:
Style 1–Glass
1. Remove the meat drawer. Tilt up the front of the cover and lift
at the back. Pull the cover straight out.
2. Replace the cover by guiding the rear hooks into the shelf
supports. Tilt the cover up at the front until the rear hooks
drop into the slots. Lower the front of the cover to a level
position and replace the meat drawer.
Style 2–Plastic
1. Remove the meat drawer. Tilt the cover up at the front and
pull it forward and out.
2. Replace the meat drawer cover by fitting the notches and rear
edge of the cover over rear and center crossbars on the shelf.
Lower cover into place and replace the meat drawer.
Crisper Humidity Control
(on some models)
You can adjust the amount of humidity in the moisture-sealed
crisper using the settings between HIGH and LOW.
LOW (open) lets moist air out of the crisper for best storage of
fruits and vegetables with skins.
■ Fruit: Wash, let dry and store in refrigerator in plastic bag in
crisper. Do not wash or hull berries until they are ready to use.
Sort and keep berries in original container in crisper.
■ Vegetables with skins: Place in plastic bag or plastic
container and store in crisper.
HIGH (closed) keeps moist air in the crisper for best storage of
fresh, leafy vegetables.
■ Leafy vegetables: Wash in cold water, drain and trim or tear
off bruised and discolored areas. Place in plastic bag or
plastic container and store in crisper.
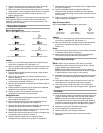
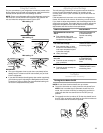
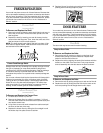
Humidity Control Location
Humidity Control on crisper drawer
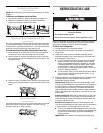
Chilled Meat Drawer
(on some models)
Slide the meat drawer temperature control forward to make the
meat drawer less cold or backward to make the drawer more
cold.
Meat Storage Guide
Store most meat in original wrapping as long as it is airtight and
moisture-proof. Rewrap if necessary. See the following chart for
storage times. When storing meat longer than the times given,
freeze the meat.
Fresh fish or shellfish.........................use same day as purchased
Chicken, ground beef, variety meats (liver)......................1-2 days
Cold cuts, steaks/roasts ..................................................3-5 days
Cured meats...................................................................7-10 days
Leftovers - Cover leftovers with plastic wrap, aluminum foil, or
plastic containers with tight lids.
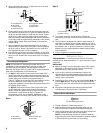
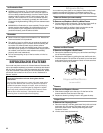
Wine or Can/Bottle Rack
(on some models - Accessory)
To Remove and Replace the Wine Rack (left) or Can/Bottle
Rack (right):
1. Remove the rack by pulling it straight out from the shelf.
2. Replace the rack by sliding it in between the shelf and the
wall of the refrigerator.
Utility or Egg Bin
(on some models - Accessory)
Depending on your model, you may have a one-, two- or
three-piece bin. Eggs may be stored in the egg tray or loose in
the bin.
NOTE: Store eggs in a covered container for long-term storage. If
your model does not have an egg storage bin, store eggs in their
original carton on an interior shelf.
COLDER
COLD