


16
Do not allow the Stainless Steel Cleaner & Polish to come into
contact with any plastic parts such as the trim pieces,
dispenser covers or door gaskets. If accidental contact does
occur, clean plastic part with a sponge and mild detergent in
warm water. Dry thoroughly with a soft cloth. To order the
cleaner, see the “Accessories” section.
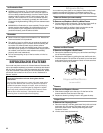
5. There is no need for routine condenser cleaning in normal
home operating environments. If the environment is
particularly greasy or dusty, or there is significant pet traffic in
the home, the condenser should be cleaned every 2 to
3 months to ensure maximum efficiency.
If you need to clean the condenser:
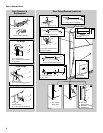
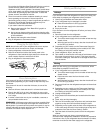
■ Remove the base grille. See “Base Grille” graphic or
“Base Grille” section.
■ Use a vacuum cleaner with a soft brush to clean the grille,
the open areas behind the grille and the front surface area
of the condenser.
■ Replace the base grille when finished.
6. Plug in refrigerator or reconnect power.
Changing the Light Bulbs
NOTE: Not all bulbs will fit your refrigerator. Be sure to replace
the bulb with one of the same size, shape, and wattage.
1. Unplug refrigerator or disconnect power.
2. Remove the bulb from behind the control panel in the
refrigerator or from behind the light shield in the freezer (on
some models). Replace it with a bulb of 25W.
3. Plug in refrigerator or reconnect power.
Power Interruptions
If the power will be out for 24 hours or less, keep the door or
doors closed (depending on your model) to help food stay cold
and frozen.
If the power will be out for more than 24 hours, do one of the
following:
■ Remove all frozen food and store it in a frozen food locker.
■ Place 2 lbs. (907 g) of dry ice in the freezer for every cubic
foot (28 L) of freezer space. This will keep the food frozen for
2to 4days.
■ If neither a food locker nor dry ice is available, consume or
can perishable food at once.
REMEMBER: A full freezer stays cold longer than a partially filled
one. A freezer full of meat stays cold longer than a freezer full of
baked goods. If you see that food contains ice crystals, it may be
refrozen, although the quality and flavor may be affected. If the
condition of the food is poor, dispose of it.
Holiday and Moving Care
Holidays
If you choose to leave the refrigerator on while you’re away, use
these steps to prepare your refrigerator before you leave.
1. Use up any perishables and freeze other items.
2. If your refrigerator has an automatic ice maker:
■ Raise wire shutoff arm to OFF (up) position.
■ Shut off water supply to the ice maker.
3. Empty the ice bin.
If you choose to turn the refrigerator off before you leave, follow
these steps.
1. Remove all food from the refrigerator.
2. If your refrigerator has an automatic ice maker:
■ Turn off the water supply to the ice maker at least one day
ahead of time.
■ When the last load of ice drops, raise the wire shutoff arm
to the OFF (up) position.
3. Depending on your model, turn the Thermostat Control (or
Refrigerator Control, depending on the model) to OFF. See
the “Setting or Using the Controls” section.
4. Clean refrigerator, wipe it, and dry well.
5. Tape rubber or wood blocks to the tops of both doors to prop
them open far enough for air to get in. This stops odor and
mold from building up. Take care not to damage the door seal
with the blocks.
Moving
When you are moving your refrigerator to a new home, follow
these steps to prepare it for the move.
1. If your refrigerator has an automatic ice maker:
■ Turn off the water supply to the ice maker at least one day
ahead of time.
■ Disconnect the water line from the back of the
refrigerator.
■ When the last load of ice drops, raise the wire shutoff arm
to the OFF (up) position.
2. Remove all food from the refrigerator and pack all frozen food
in dry ice.
3. Depending on your model, turn the Thermostat Control (or
Refrigerator Control, depending on the model) to OFF. See
the “Setting or Using the Controls” section.
4. Unplug the refrigerator.
5. Empty water from the defrost pan located behind the base
grille.
6. Clean, wipe, and dry thoroughly.
7. Take out all removable parts, wrap them well, and tape them
together so they don’t shift and rattle during the move.
8. Depending on the model, raise the front of the refrigerator so
it rolls more easily OR screw in the leveling legs so they don't
scrape the floor. See the “Door Closing” section.
9. Tape the doors shut and the power cord to the refrigerator
cabinet.
When you get to your new home, put everything back
and refer to the "Refrigerator Installation" section for preparation
instructions. Also, if your refrigerator has an automatic ice maker,
remember to reconnect the water supply to the refrigerator.
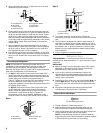
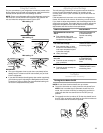
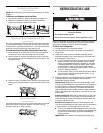
1
2
4
5
WARMER
WARMER
COOLER
COOLER
RE
C
O
M
ME
N
D
ED S
ETT
IN
G
RECOMMENDED SETTING
R
E
F
R
IG
E
R
A
T
O
R
REFRIGERATOR
3
1
2
4
5
WARMER
WARMER
COOLER
COOLER
RECOMMENDED SETTING
RECOMMENDED SETTING
FREEZER
FREEZER
3
A
L
L
O
W
2
4
H
O
U
R
S
B
E
T
W
E
E
N
A
D
J
U
S
T
M
E
N
T
S
ALLOW 24 HOURS BETWEEN ADJUSTMENTS
3
3