


5
5
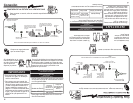
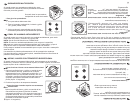
Knob in ignition position.
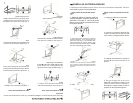
A - Locate the screw on
the air shutter and
loosen it.
B - Turn around the air
shutter.
C - Turn on the oven.
D - Verify that the flames
are blue.
E - If the flames are not
blue, repeat since
step
B, when the
flames are adjusted,
tighten the screw
again.
F - Replace the oven tray
and the oven rack.
How to adjust the oven burner air shutter:
Remove the
oven rack.
(See page 7).
1
3
Remove the oven
tray. (See page 8).
2
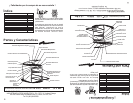
SURFACE BURNERS WITH ELECTRONIC IGNITION
To turn on the surface burners with electronic
ignition in the knob:
1.- Your range has electronic ignition integrated in knobs,
to operate, push and turn the desired knob to the
ignition position. (See illustration).
2.- To stop the sparks turn the knob to the maximum
flame position.
Perilla en posición de encendido.
Ajuste del aire del quemador del horno:
Retire la
parrilla del
horno (Ver
Pag. 7)
1
3
A - Afloje el tornillo del
regulador.
B - Gire el regulador un
poco.
C - Encienda el horno.
D - Verifique que las
flamas sean azules.
E - Si las flamas no son
azules repita desde
el paso
B, al finalizar
apriete nuevamente
el tornillo.
F - Coloque la charola
del horno y la parrilla
nuevamente en su
lugar.
Retire la charola
del horno. (Ver
Pag. 8)
2
ENCENDIDO ELECTRÓNICO DE QUEMADORES SUPERIORES
Para encender los quemadores superiores con
encendido electrónico en la perilla:
1.- Su estufa cuenta con encendido electrónico en la
perilla, para operarlo gire la perilla del quemador
que desea encender hasta la posición de encendido,
(ver figura).
2.- Para que la bujía de encendido deje de producir
chispas, gire la perilla hasta la posición de flama
máxima.
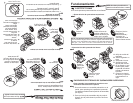
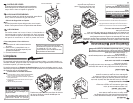
Si la estufa presenta puntas amarillas en las flamas:
Retire las
perillas.
1
Retire el frente de
perillas quitando los
tornillos del frente y de
abajo que lo sujetan.
2
3
AJUSTE DE FLAMAS
Ajuste del aire de quemadores superiores:
Empuje o jale los
reguladores
individualmente y
encienda los
quemadores hasta
obtener flamas azules.
NOTA: Las diferentes altitudes sobre el nivel del mar y las variaciones
en el suministro de gas, hacen necesario regular la entrada de aire
primario a los quemadores para obtener una adecuada mezcla de
aire-gas y así tener un buen funcionamiento de la estufa.
Funcionamiento
NOTA:
No obstruya la salida de los
gases de combustion de horno o asador
If the range has yellow flames, it may
require adjustment to the air shutters:
Remove the
knobs.
1
Unscrew the screws
of front and below the
manifold panel and
remove it.
2
3
HOW TO ADJUST THE FLAMES
How to adjust the air for surface burners:
Adjust the air shutters
individually. Light the
burner, then push or pull
the air shutter until you
get a blue flame.
How to Use Your Range
NOTE:
Do not obstruct the gas
exhaust of the oven or broiler