


8
8
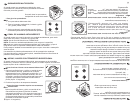
OVEN LIGHT
Your range has an oven light.To turn on the oven light push
the switch located on the left
side of the manifold panel or
open the oven door.
How to replace the oven bulb:
1.- Disconnect the power cord.
2.- Remove the bulb and replace with a new 40 watts special
appliance bulb.
3.- Connect the power cord again.
NOTE:
Connect the range in a wall outlet with a voltage of
127 V
±
10%. Be sure the installation is properly grounded.
Cleaning and Maintenance
Regularly clean grates, burners, cooktop
and the oven tray, use water,
soap and a damp cloth, avoid using abrasive or sharp objects. Periodically
clean the gap between the cooktop and the manifold panel.
Your range has the
Continuous Cleaning System
in the oven, it is
not necessary to clean the walls of the oven, the spills will burn
each time you bake.
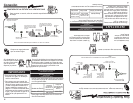
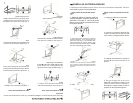
How to remove the oven tray:
1.-Before rem
ove oven tray rem
ove oven rack (page 7)
2.-Take the tray by the side holes and lift the rear side.
3.-Push the tray towards the top and back of the oven.
4.-Pull the tray out the oven.
You can use aluminum
foil to wrap the oven tray, avoid
covering the side grooves.
Do not use caustic soda or cleaning
agents which contain it to clean the
range.
Failure on following the above, will
permanently damage the surfaces
where it is applied.
IMPORTANT
LUZ DE HORNO
Su estufa cuenta con luz en el horno, la iluminación es
importante para revisar el horneado sin abrir la puerta.
La luz enciende al operar el interruptor en el lado izquierdo
del panel de controles o al abrir la puerta del horno.
NOTA: El cable tomacorriente debe
conectarse a una toma de corriente con
un voltaje de 127 V
± 10%.
Cerciórese de que la instalación esté
apropiadamente aterrizada.
Limpieza
Es necesaria la limpieza periódica de la estufa, use agua, jabón y un trapo húmedo, no
use fibra metálica, porque se
rallan los componentes. Limpie
regularmente el hueco entre
la cubierta superior y el frente de perillas.
Su estufa cuenta con el
Sistema de Autolimpieza
en el horno (acabado rugoso), no es
necesario que limpie las paredes, ya que con cada horneado se van quemando los residuos
de alimentos que se van salpicando.
Como retirar la charola del horno:
1.- Antes de retirar la charola, zafe las varillas laterales,
com
o se indica en el paso No.2 (Ver pag.8) .
2.-Tom
e la charola de las ranuras laterales y levántela
de la parte trasera.
3.-Em
puje la charola hacia adentro del horno para
destrabarla.
4.-Jale la charola para sacarla.
No utilice sosa cáustica o productos
de limpieza que la contengan para
limpiar la estufa.
De no seguir esta instrucción se
ocasionarán daños permanentes en las
superficies donde se aplique.
IMPORTANTE
Puede usar papel aluminio para forrar la charola
del horno, teniendo cuidado de
NO
tapar las
ranuras de la misma.
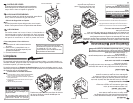
El capelo de vidrio templado aunque es resistente,
debe manejarse con cuidado para evitar que se
rompa. Abra o cierre el capelo sin golpearlo.
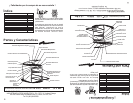
CAPELO DE VIDRIO
VÁLVULA DE SEGURIDAD
Su estufa cuenta con válvula
de seguridad, esta válvula
abre y cierra el suministro de gas a la estufa.
Válvula de Seguridad en Capelo:
La válvula permite el paso del gas solo con el capelo
abierto. Para operar el horno el capelo debe estar abierto.
Para reemplazar el foco del horno:
1.- Desconecte el cable tomacorriente de
la estufa.
2.- Retire el foco y reemplácelo con un
foco nuevo de 40 watts especial para
aparatos domésticos.
3.- Conecte la estufa nuevamente.
GLASS LID
The glass lid is made of resistant tempered glass, it
should be handled with care to avoid breaking the
glass. Open or close the glass lid with care.
SHUT OFF VALVE
Your range includes a shut off valve.
This valve controls the gas supply to the range.
Glass Lid Shut Off Valve:
The shut off valve operates with the glass lid, when the
glass lid is opened, the shut off valve is opened, when
the glass lid is closed the shut off valve is closed. To
operate the oven, the glass lid must be opened.
CAPELO
VÁLVULA DE SEG
URIDAD
SHUT O
FF VALVE
G
LASS LID