


OPERATING YOUR HEATER
Once the stove has been properly assembled and connected to a grounded electrical outlet,
it is ready to operate:
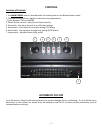
Main Power:
1. The main power switch (#1) is located on the Blower/Heater assembly (next to front right leg), below the
control panel. Press this button for main power to the unit. The indicator light will turn red.
Open control panel door, located above the main power switch, by the knob of front of
stove.
2. Thermostat control knob:
To adjust the temperature to your individual requirements, turn the thermostat dial (#2) to the right
(clockwise) to increase the desired temperature, or to the left (counter-clockwise) to decrease desired
temperature. This thermostat control dial can only be used while the FAN switch (#3) and one or both of the
750W/750W (# 4 & 5) switches are in the “on” position. When the heater reaches the desired temperature,
the heater and one or both of the 750W indicator lights will turn off.
3. Fan:
Use alone for “cool air” flow. Fan switch (#3) must be in the “on” position for heat settings to function.
4. 750W:
For low heat function - Press 750W switch (#4) while the FAN switch (#3) is in the “on” position for low heat.
The indicator light will turn on.
5. 1500W: (Both 750W Switches)
For high heat function - Press second 750W switch (#5) while the FAN and (# 4) switches are in the “on”
position for high heat. The indicator light will turn on.
6. Flame Effect:
Press Flame effect switch (#6) to the “on” position for flame effect. The indicator light will turn on. This
function can be used without heat or fan functions being engaged.
7. Flame Dimmer Control:
Turn the dimmer dial (#7) clockwise or counter-clockwise to get the desired flame intensity. The dimmer
switch can only be used when the Flame effect switch is in the “on” position.
NOTE:
Heat functions will NOT operate unless the fan switch (#3) is in the “on” position.
~ 8 ~