


16
Fig. 10
Fig. 9
Fig. 8
Oven Cavity
The enamelled oven cavity is best cleaned whilst still
warm.
It is preferable/advisable to wipe the oven door with a
soft cloth soaked in warm detergent water, after each
use. However, occasionally, it will be necessary to do
a more thorough cleaning using a proprietary oven
cleaner. Do not use aerosol oven cleaners,
abrasive scourers or steel wool.
'Stay Clean' oven lining
This cooker is fitted with a set of coated liners. These
are known as 'stay clean' or 'easy care'. To obtain
the maximum efficiency from your liners, follow the
guidelines carefully for their use and care.
The linings are coated with a special substance
which helps to clean itself by a process of
oxidazation. Although the linings will not remain
absolutely spotless, they will reduce your oven
cleaning chores considerably when used in the
correct way.
The linings work most effectively if the splasher are
kept to a minimum, and the soil is not allowed to
build up, as this will retard the cleaning action. If the
oven has been used at low temperatures, it should
be heated for one hour on 200°C.
Never use abrasive scourers, steel wool pads or an
aerosol oven cleaner on the coated linings.
Removing/replacement of the 'stay clean'
oven liner panels
It is not necessary to disconnect the appliance from
the electricity supply when removing the side panels.
However, you must disconnect the electricity supply,
before attempting to remove the back panel, by
turning off at the wall socket or cooker box and
removing the plug from the wall.
Occasionally it will be necessary to remove the oven
liner panels to facilitate oven cleaning. To do the,
proceed as follows:
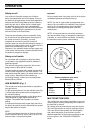
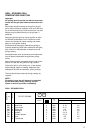
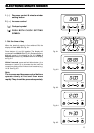
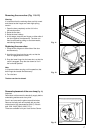
1. Unscrew the ring nuts, securing the side runners,
and remove the runners (Fig. 8).
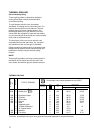
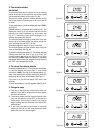
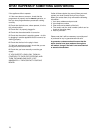
2. Slide the side panels toward yourself to release
them from their retaining pins, then lift away from
the oven wall (Fig. 9).
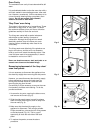
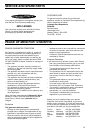
3. Make sure that the electricity supply to the
appliance is disconnect/ Then using a suitable
Philips screwdriver, unscrew the four fixing screws
on the back panel (Fig. 10). This is a good
opportunity to clean the rear side of the back
panel.
4. To replace the panels, reverse the above
procedure.
FO 0145
FO 0085
FO 0028