


24
SERVICING WARNING
Disconnect from electricity before servicing. Check appliance is safe when you have finished.
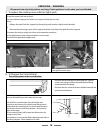
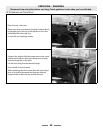
22. To Remove an Oven Inner Back
Open the oven door.
For the left hand oven unscrew the 2 thermostat phial fi xing
screws. See section 12 ‘To Remove a Thermostat’ for more
detail on the thermostat phial fi xing screws.
Remove the screws that secure the inner back to the oven
rear. Lift the removable panel away.
Re-assemble in reverse order. Ensure that the retaining screws
are fully tightened.
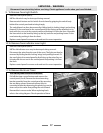
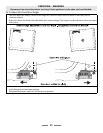
23. To Replace an Oven Fan
Pull the range forward to access the cover boxes at the rear of the range, see the
section ‘How To Move the Range for Servicing’.
Remove the screws that secure the rear cover and lift it clear. Remove the fan
wiring, noting the colors and connection positions. Remove the inner back as
detailed in Section 22.
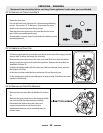
Hold the fan blades and undo the centre nut (left hand thread), brass washers,
fan blade and Circlip.
Undo the nuts that retain the fan and remove it from the cavity rear.
Fit the replacement and re-assemble parts in reverse order. Check that the oven
operates satisfactorily.
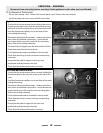
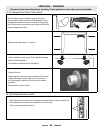
24. To Remove an Oven fan Element
Remove the oven inner back as detailed in Section
22.
Remove the screws that secure the element within
the oven and lift the element away carefully.
Disconnect the leads noting the colors and
connection positions and connect to the
replacement element and re-assemble parts in
reverse order.