


O
VEN BEEPING is used to indicate a Y
ES o
r N
O r
esponse to operator input.
Beeps also indicate mode CHANGES and ERROR conditions.
O
ne brief beep indicates a YES (
enabled) response to the information entered into the control.
Two brief beeps indicate a NO (disabled) response to the information entered into the control.
A beep that lasts for one second indicates an oven mode T
RANSITION. Example: Preheat to Ready-Start.
Three brief beeps indicate the oven is in the R
EADY mode for product loading and START-UP.
Four brief beeps indicate an existing F
AULT condition. Refer to the Trouble Shooting section of this manual.
Beeper volume can be changed. With the control in the O
FF mode, press and hold the DOWN ARROW Key until the display
exhibits one of the 4 volume levels (0 being O
FF or the lowest, and 3 being the highest). After each change, the button must be
released and the display must clear before the procedure can be repeated to select a different volume level.
A U DI B L E S I G N A L S
Turn the Oven Control Panel Off:
Press and hold the O
N/OFF Key until the oven beeps. The ON/OFF
indicator light will go out.
Stop an Operation:
Press and hold the S
TART Key for several seconds until the control
beeps, indicating the operation has been cancelled. The oven will
remain in a power-on state.
Arrow Keys:
Cook, Hold and Probe Temperature set points can be adjusted by 1°
when pressing the A
RROW Keys. To change a set point more rapidly,
press and hold the A
RROW Key along with the key for the temperature
function, and the temperature changes in steps of 10°F or 5°C.
The Time setting is adjusted in increments of one minute by pressing
the A
RROW Keys. To make adjustment in steps of ten minutes, press
and hold the T
IME Key and ARROW Key at the same time.
Probe Usage:
When the oven probe remains inserted in the probe bracket, the LED
temperature display will indicate the ambient air temperature inside
the oven. To use the probe for cooking remove it from the bracket
and wipe the full length of the metal probe with a disposable alcohol
pad to clean and sanitize before using.
Only the tip of the probe senses the internal product temperature;
therefore, it is important the tip be placed correctly in the product for
internal temperature accuracy. Push the probe tip halfway into the
product, positioning the tip at the center of the food mass. When
inserting the probe into solid foods such as meat roast or poultry
breasts, push the probe in from a straight downward position or in
from the side to the center position. If placing into a semi-liquid or
liquid product, the probe cable must be secured to keep the probe
positioned properly. Do not let the probe tip touch the edges, bottom
or side of a container. Tape the probe cable to the lip or edge of
the container.
Display High/ Low Probe Temperatures:
To observe the recorded maximum or minimum
probe temperature when cooking by probe, press
the following keys while the probe remains in the
product:
Highest Temperature: Press P
ROBE Key and UP
ARROW Key at same time.
Lowest Temperature: Press P
ROBE Key and DOWN
ARROW Key at same time.
Halo Heat Indicator:
When the oven is preheating the Halo Heat
indicator light will remain illuminated until it
reaches the set cook temperature. Once the
temperature has stabilized, this indicator will
illuminate periodically as the oven calls for heat.
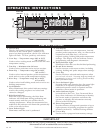
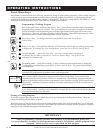
Green and Amber Indicators:
Each program key includes a green light which
indicates a requirement for additional
programming by the operator or the current
operational state of the oven.
The C
OOK, TIME, PROBE, and
H
OLD keys include an amber
indicator light to identify the
information being displayed.
Power Fail Detect:
If the power were to fail for any reason while
heating, the control will retain, in memory, the
programmed operating conditions. When power
is restored, the control will resume operating
from the point where it was interrupted and the
O
N/OFF indicator light will flash, indicating that
such an event did occur. The operator can turn
off the flashing light by pressing the O
N/OFF key.
NOTE: If su ch an eve nt h as occurre d, it is
strongly recommended that you ensure the food is
safe for consumption according to local health
regulations.
O P ER AT I NG F E AT U R E S & FU NC T I O N S
Amber
Green
NOTE: When cooking by probe, insert the probe into the raw
product after the oven has been preheated.
WAIT ONE FULL MINUTE
to allow the probe temperature to
decrease to the internal temperature of the product. Press the
start button to begin the cooking process after this probe
temperature adjustment period. A false probe reading of the
internal product temperature will cause the oven to default to a
holding temperature.
O P E R A T I N G I N S T R U C T I O N S
TH/III INSTALLATION/OPERATION/SERVICE MANUAL PG. 15