


2
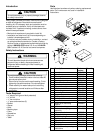
Parts
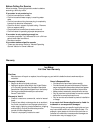
Use listed part numbers only when ordering replacement
parts. Part numbers are not used in installation
instructions.
Item Description Part
number
Quantity
1 Ice makers D7824703 1
2 Ice maker cover D7820401 1
3 Warning label A3036901 1
4 Ice maker arm 10901401 1
5 Stainless steel clip B5720301 1
6 Water fill tube extension A3127412 1
7 Ice maker wire harness D7826301 1
N/S Thermal fuse clip 10319801 1
8
5
/
8
" sheet metal screw M0211018 3
9 Button plug M0311301 2
10 Ice storage bucket D7806201 1
11 Stop pins M0560005 2
12 Sliding shelf D7839703 1
13 Sliding shelf decorative insert C8986123 1
14 Water valve D7712603 1
15 Water valve mounting
bracket
10496302 1
16
3
/
8
" thread cutting screw M0251015 3
17 Water valve coupling
assembly
10244903 1
18 Nylon nut and sleeve M0753001 1
19 ¼" plastic tubing B5705321 1
20 Anti-kink spring A1055101 1
21 Stainless steel insert A3223101 1
22 Tube clamp M0114003 1
23 “P” clamp M0104101 1
24 Plastic clip M0104101 1
25 Installation and operating
instructions
10527025 1
Introduction
CAUTION
!
To avoid personal injury or property damage, observe
all safety instructions.
Verify proper ice maker kit model, listed on wiring diagram
on back of refrigerator. Read entire manual before
installing kit. All necessary tools and materials must be
available prior to installation. Verify all listed parts are
included in kit. If parts are missing, contact source from
whom kit was purchased.
• Mechanical experience is required to install kit.
• Installation can take from 3 to 6 hours depending on
installer’s knowledge and skill.
• If unable to solve a problem during installation, contact
an authorized Amana technician. Locate a Factory
Service Center or independent authorized technician by
calling 1-800-628-5782 inside U.S.A. and 1-319-622-
5511 outside U.S.A. Service is at owner’s expense.
Safety Instructions
WARNING
!
To avoid electrical shock which can cause severe
personal injury or death, disconnect power to
refrigerator before installing kit. After installing kit,
reconnect power.
CAUTION
!
To avoid property damage, observe the following:
• Confirm water pressure to water valve is at least 20
pounds per square inch.
• Start nuts by hand to avoid cross threading. Finish
tightening nuts with wrenches. Do not overtighten.
• Check carefully for water leaks prior to returning
refrigerator to normal location and 24 hours after
connection.
Tools Required
•
3
/8" electric drill (ground fault protected)
•
3
/8" drill bit
•
1
/4" hex nut driver
•
1
/2" open-end wrenches (2)
• Bucket
• Gloves
• Knife
• Masking tape
• Pliers
• Screwdriver
• Slip joint
• Towel
1
2
3
4
5
7
8
10
6
9
11
12
13
14
15
16
17
18
19
20
21
22
24
23
25