


3
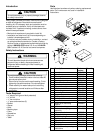
Materials Required
Important
• Before connecting ice maker, contact a plumber to
connect copper tubing to household plumbing in
compliance with local codes and ordinances.
• Amana Appliances recommends using a saddle valve.
Do not use self-piercing valve. Amana Appliances is
not responsible for property damage due to improper
installation or water connection.
1
/4" (6 mm) outside diameter flexible copper tubing*.
*Length of copper tubing must reach from water supply
connection plus an additional 8' (3 m) for service loop
behind refrigerator. Tubing should be soft instead of rigid
and ends should be free of burrs.
Procedure
1. Turn off water supply to refrigerator.
CAUTION
!
To avoid property damage, protect soft vinyl or other
flooring with cardboard, rugs, or other protective
material when moving refrigerator.
2. Move refrigerator away from wall. Disconnect power.
3. Seal open end of copper tubing with masking tape to
keep inside of tubing clean. Route copper tubing up to
refrigerator through floor or interior wall behind
refrigerator providing
3
/8" (10 mm) holes as required.
Temperature surrounding copper tubing must be
above 35°F (1°C) to prevent water line from freezing.
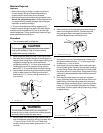
4. Secure water valve mounting bracket behind square
collar on water valve inlet. Attach ground wire to
bracket with a
3
/8" (10 mm) cutting screw and a
1
/4"
hex nut driver.
A
B
A. Ground wire B.
3
/8" screw
Ground wire attachment
WARNING
!
To avoid electrical shock which can cause severe
personal injury or death, ground wire must be properly
attached to both bracket and water valve.
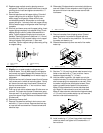
5. Remove lower horizontal and upper vertical cover on
rear of refrigerator cabinet by removing screws with a
1
/4" hex nut driver. On 22, 25, and 27 cubic foot
models, remove black plastic spacer with a
1
/4" hex
nut driver.
Cover removal
6. Remove electrical wiring plugs from retainer clamp on
lower rail of refrigerator cabinet. Connect electrical
wiring plugs to water valve spade terminals. Non-
polarized plugs connect to either terminal.
A
A. Electrical wiring plug
Electrical connection
7. Secure water valve to 2 predrilled holes in lower rail of
refrigerator cabinet with two
3
/8" (10 mm) long cutting
screws and a
1
/4" hex nut driver.
8. Insert plastic tubing from water valve under lower right
corner of metal cover. Carefully thread plastic tubing up
to water fitting. Plastic tubing should move freely under
top center portion of vertical cover. Route plastic tubing
under wiring harness between top of vertical cover and
water fitting.
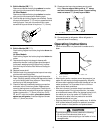
9. Push stainless steel insert into open end of plastic
tubing. Stainless steel insert must be flush with end of
plastic tubing. Hold hose clamp open with pliers and
slide hose clamp over water fitting. Push end of plastic
tubing
5
/8" (16 mm) into water fitting stem and release
hose clamp. Confirm plastic tubing is secure by pulling
on plastic tubing.
A
B
A. Hose clamp B. Stainless steel insert
Water hose attachment to back of refrigerator