


5
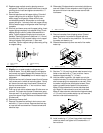
32. Create service loop using extreme care to avoid
kinks. Secure copper tubing with a “P” clamp
and back horizontal cover screw. Copper tubing
must not extend
3
/8" (9 mm) beyond back.
A
A. "P" clamp
Secure service loop
33. Connect power to refrigerator. Move refrigerator in
place and level if necessary.
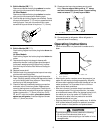
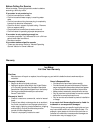
Operating Instructions
• Confirm ice bucket is in place and ice maker arm is
down.
A
B
C
A. Locked position B. Ice maker arm
C. Down position
• After freezer section reaches normal temperature, ice
maker fills with water and begins operating. Allow 24–
48 hours after installation before first harvest of ice. Ice
maker produces 7 to 9 harvests of ice in a 24-hour
period under ideal conditions.
• After ice is formed, ice maker drops ice cubes into
ice storage bucket. During ice production, ice maker
arm raises and lowers. When ice storage bucket is full,
ice maker arm turns ice maker off. Discard first 3
harvests of ice after initial ice production and after
extended periods of non-use.
• Stop ice production by lifting ice maker arm. A definite
click is heard when off position is reached. Ice maker
arm will remain in that position until pushed down.
CAUTION
!
To avoid damage to ice maker, observe the following:
• Do not force ice maker arm down or up.
• Do not place or store anything on ice maker or in ice
storage bucket.
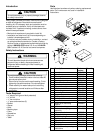
24. Built-In Models (SB******)
Remove and discard button plugs above ice maker
with a putty knife covered with masking tape.
All Other Models
Remove and discard button plugs below ice maker
with a putty knife covered with masking tape.
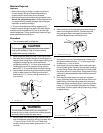
25. Confirm stop pin locking fingers are unlocked. Center
drive pin must extend
1
/2" (13 mm) on opposite side of
locking fingers. If not pull out center drive or use a
screwdriver to push center drive pin out
1
/2" (13 mm).
Stop pin inspection
26. Built-In Models (SB******)
Push locking fingers into button plug holes above ice
maker.
All Other Models
Push locking fingers into button plug holes below ice
maker.
27. Tap center drive pins into stop pin sleeves with
screwdriver handle. Locking fingers should expand
inside wall, wedging locking fingers firmly in place.
End of drive pins must be flush with end of stop pin
sleeves.
28. Replace freezer shelf.
29. Position back of ice storage bucket up and over stop
pins to avoid overfilling bucket.
30. Remove paper backing from sliding shelf decorative
insert. Carefully position sliding shelf decorative insert
on front of sliding shelf then press on. Place sliding
shelf on top of ice storage bucket.
31. Check for leaks at household plumbing connection
and water valve. Correct any leaks. Replace lower
cover by placing cover on refrigerator. Carefully tuck
wires inside cover to avoid pinching wires. Insert and
tighten screws with a
1
/4" (6 mm) nut driver. On 22,
25, and 27 cubic foot models, place black plastic
spacer on refrigerator. Insert and tighten screws
with a
1
/4" (6 mm) nut driver.