


Non-Use Periods
Vacation Time. If you will be
away for vacation, remove perishable
foods from the unit. Shut off the ice
maker by turning off the water
supply to the refrigerator and
moving the icemaker wire arm to its
uppermost position.
Extended periods of non-use.
If you are going to be away for
longer periods, empty and unplug
the unit. This will reduce needless
operation and assure that food will
not be spoiled if electrical service is
interrupted Just clean the unit as
instructed in this manual and prop
open the doors so air can circulate
inside, Leave the unit unplugged. If
the refrigerator has an automatic
icemaker, turn off the water supply
to the refrigerator.
When You Move. Unplug the unit
and clean it. Use strapping tape or
masking tape to secure all trays,
shelves and other parts to prevent
damage during shipment. Do not
leave the unit closed for an
extended period of time.
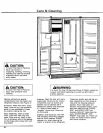
CAUTION:
To Avoid Property Damage do
NOT use tape that has
"permanent" type adhesive.
If The Refrigerator Will
Be Stored.
If the refrigerator will be stored or
remain unused in a sub-freezing
environment, remove the water and
protect the water valve from damage
as follows:
1. Disconnect the refrigerator from
the electrical power source.
2. Shut off the refrigerator water
supply. This can be done at the
saddle valve with the 1/4" copper
supply tubing joins the household
water line, For factory installed
ice makers, refer to illustration
on back of cabinet. For all other
ice makers, refer to installation
instructions.
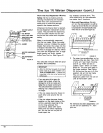
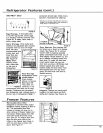
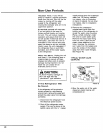
3. Remove the compressor
compartment cover from the
bottom rear of the refrigerator to
reveal the water valve coupling.
Place a small container under
the valve to catch water spills.
Remove the brass hose fitting
from the valve, Label the two
plastic tubes attached to the
valve. Unscrew the compres-
sion nut(s) from the tube(s) and
push the end(s) of the tube(s)
away from their valve fitting(s),
See Figure 48.
TYPICAL WATER VALVE
COUPLING
,_. _ _. DUOt _iolenold COlt
_ Hose
:: Fitting
_ _aptor
Tube With
Sleeve
Brass
Nut
FIGURE 48
4. Blow the water out of the water
dispenser plastic tubing with
compressed air.
20