


Page 10
FITTING THE FITTING THE
FITTING THE FITTING THE
FITTING THE
D3252XLFI, D3532XLFI AND D3532XLFIWSD3252XLFI, D3532XLFI AND D3532XLFIWS
D3252XLFI, D3532XLFI AND D3532XLFIWSD3252XLFI, D3532XLFI AND D3532XLFIWS
D3252XLFI, D3532XLFI AND D3532XLFIWS
CUSTCUST
CUSTCUST
CUST
OM DOOROM DOOR
OM DOOROM DOOR
OM DOOR
P P
P P
P
ANELANEL
ANELANEL
ANEL
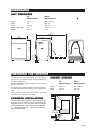
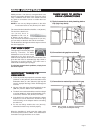
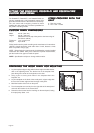
The D3252XLFI, D3532XLFI, and D3532XLFIWS can
only be installed with a fully-integrated custom door
panel that extends from the toe kick to the counter top.
The unit comes with everything needed to make
installing the door panel easy. The door is predrilled for
the panel’s mounting screws.
Width: 23-1/2” (597 mm)
Height: 30 1/8" (765 mm)
(Measured from the top of the panel to the lower edge of
the kitchen cabinet.)
Thickness: 3/4” (19 mm) max
Weight: Up to 22 lb.
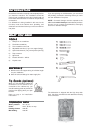
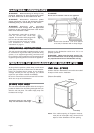
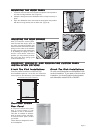
Fit the handle onto the panel according to the manufacturer’s instructions.
(NOTE: A handle should be used rather than a knob, because a knob
does not provide enough grip.)
NOTE: Before fitting the custom panel, the dishwasher must be installed
underneath the cabinet. After you’ve made the required measurements,
pull the machine out again to install the panel.
NOTE: Specifications subject to change without notice.
PREPPREP
PREPPREP
PREP
ARING ARING
ARING ARING
ARING
THE THE
THE THE
THE
WW
WW
W
OOD POOD P
OOD POOD P
OOD P
ANEL FOR MOUNTINGANEL FOR MOUNTING
ANEL FOR MOUNTINGANEL FOR MOUNTING
ANEL FOR MOUNTING
ITEMS PRITEMS PR
ITEMS PRITEMS PR
ITEMS PR
OO
OO
O
VIDED VIDED
VIDED VIDED
VIDED
WITH WITH
WITH WITH
WITH
THETHE
THETHE
THE
UNITUNIT
UNITUNIT
UNIT
♦ Two 3/8” screws
♦ Four 1-3/4” screws
CUSTCUST
CUSTCUST
CUST
OM POM P
OM POM P
OM P
ANEL DIMENSIONSANEL DIMENSIONS
ANEL DIMENSIONSANEL DIMENSIONS
ANEL DIMENSIONS
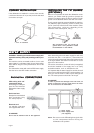
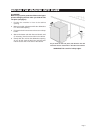
1. Lay the template edge-to-edge with the lower edge of the dishwasher
door or the adjusting frame. The broken line on the template must
pass through the center of the keyholes on the door.
2. Using a pen or screw, punch holes in the template where the
keyholes are.
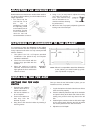
3. Lay the template on the back of the wood panel, edge-to-edge with
the rear of the lower edge and the left edge of the panel.
4. Mark the location of the hole on the panel.
5. Turn the template over and lay it on the right side of the wood panel
and mark the location of the second hole.
6. Screw the short screws into the markings on the wood panel, letting
them project by about 1/16".
.
30 1/8
"
765 mm