


8
Clean The Stainless Steel Interior:
Baked on splatter, oil, grease or discoloration on the stainless steel inside of the oven may be removed with
stainless steel cleaner, or any other similar cleaning agent. NEVER use vinegar or any corrosive cleaner.
Use only cleaners approved for stainless steel. NEVER use cleaning solvents with a hydrocarbon base.
NEVER use a wire brush, steel or abrasive scouring pads, scraper, file or other steel tools.
NOTE: ALWAYS RUB THE STAINLESS STEEL ALONG THE GRAINS.
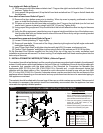
Clean The Blower Wheel:
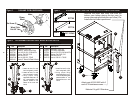
To clean the blower wheel, remove and immerse in ammoniated water for 20 to 25 minutes. Then, scrub it off
with a small, stiff brush. The same procedure can be followed for wire racks and rack supports. To remove
the blower wheel, loosen the set screws (2) on the hub of the blower wheel and tighten the 3/8” wheel puller
bolt (supplied) in center of hub (See Fig. 1).
Clean The Porcelain Interior:
Porcelain enamel interiors are designed to be as maintenance free as possible. However, for best results,
the oven should be cleaned regularly. Enameled interiors can be easily cleaned with oven cleaners. KEEP
CLEANING FLUIDS AWAY FROM ELECTRICAL WIRES, LIGHT SOCKETS, SWITCHES AND
CONTROL PANEL.
OVEN EXTERIOR:
Clean The Exterior Stainless Steel:
To remove normal dirt or product residue from stainless steel, use ordinary soap and water (with or without
detergent) applied with a sponge or cloth. Dry thoroughly with a clean cloth. Never use vinegar or corrosive
cleaner. Do not use chorine based cleaners.
To remove grease and food splatter or condensed vapors that have baked on the equipment, apply cleaners
to a damp cloth or sponge and rub cleanser on the metal in the direction of the polished lines on the metal.
Rubbing cleanser as gently as possible in the direction of the polished lines will not mar the finish of the
stainless steel. To remove discoloration, use a non-abrasive cleaner. NEVER use a wire brush, steel or
abrasive scouring pads, scraper, file or other steel tools. NEVER RUB WITH A CIRCULAR MOTION.
D. SERVICING:
NOTE: THIS APPLIANCE MUST BE SERVICED BY AN AUTHORIZED SERVICE AGENT.
(1) Power supply to the unit must be disconnected before any service is performed.
(2) Most of the service on the unit can be performed from the front and/or control panel side.
(3) For proper servicing, access to the control panel side of the unit will be required.
(4) It will be necessary to have access to the back of the oven for service needs related to the gas supply
and electric power supply.
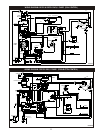
(5) A system wiring diagram is provided in this manual and on the back of the service panel on the right
side of the oven.
(6) This unit is provided with a permanently lubricated electric motor.
(7) All servicing should be performed by a factory-authorized technician only.
(8) For proper maintenance and repairs, call the factory toll free (800-431-2745) for an authorized
service agency in your area.
NOTE: THE VENTILATION SYSTEM MUST BE INSPECTED AT LEAST EVERY SIX MONTHS AND
MAINTAINED CLEAN AND FREE OF OBSTRUCTIONS.
FRONT TRIM REMOVAL INSTRUCTIONS
(1) Remove the two screws holding the top of the front panel in place.
(2) Tilt the front panel forward.
(3) Remove the tab at the bottom of the front panel from the slot in the bottom trim.
(4) Open the doors.
(5) Remove the screws in the top of the bottom trim.
(6) Lift the bottom trim straight up approximately 1/4".
(7) After the bracket on the inside of the front trim has cleared the flange on the base, pull the bottom
trim away from the oven to remove.