


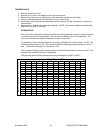
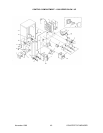

November 1999 42 COUNTER TOP IMPINGER
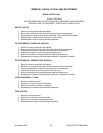
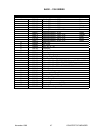
HEATING ELEMENT
(Color Coded on the Cold Zone)
PART# 369418
Heating Element 208V Red
PART# 369419
Heating Element 240V Blue
PART# 369450
Heating Element 220V Yellow
PART# 369455
Heating Element 200V Orange
PART# 369456
Heating Element 380V Violet
PART# 369457
Heating Element 415V Green
PART# 369475
Heating Element 200V 3 PH Orange
PART# 369476
Heating Element 380V 3 PH Violet
PART# 369477
Heating Element 415V 3 PH Green
PART# 370104
Heating Element 400V 3 PH Brown
PART# 370105
Heating Element 400V 1 PH Brown
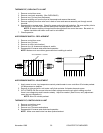
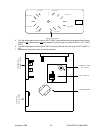
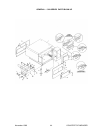
1. Remove six (6) acorn nuts holding motor cover and remove
2. Remove connectors from element.
3. Remove four (4) acorn nuts holding oven back assembly and remove.
4. Remove three (3) screws from heating element brackets and slide element out of back assembly.
5. Reassemble in reverse order. Verify by color code, dot or band on element that correct element is
being installed. Refer to chart above:
NOTE:
Be certain to replace insulation seal each time oven back is removed.
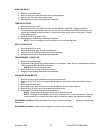
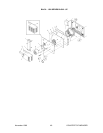
AIR PUMP
1. Remove six (6) acorn nuts holding motor cover and remove.
2. Disconnect motor, capacitor, and element leads and mark wires for reinstallation.
3. Remove four (4) acorn nuts holding oven back assembly and remove.
4. Remove main fan. (Note location, approximately 3/16" from back wall on motor shaft.)
5. Remove heating element.
6. Remove five (5) screws from inner back assembly and lift off.
7. Loosen two screws on air pump hub and slide off shaft. (Note location for reinstallation
(approximately 3/64" clearance from back wall).
8. Reinstall in reverse order and check operation. Allow 30 minute preheat and verify that fan is not
rubbing.
NOTE:
Be certain to replace insulation seal each time oven back is removed.
MAIN FAN MOTOR
1. Remove six (6) acorn nuts holding motor cover and remove.
2. Disconnect motor, capacitor, and heating element and mark wires for reassembly.
3. Remove four (4) acorn nuts holding oven back assembly and remove.
4. Remove heating element (See "heating element removal").
5. Remove main fan, NOTE position ("See fan removal").
6. Remove five (5) screws from inner back and separate.
7. Remove air pump assembly
NOTE
location.
8. Remove four (4) screws from motor mount pedestal and lift motor and pedestal off outer back
assembly.
9. Remove four (4) nuts from front motor studs and remove mounting pedestal.
10. Reassemble in reverse order and check operation.
NOTE
: Be certain to replace insulation seal each time oven back is removed