


5
1.0 INSTALLATION INSTRUCTIONS
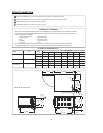
LOCATION
Allow space for plumbing and electrical connections. Minimum clearances are 2" on the sides
and 6" on the back for proper air circulation. Allow adequate access for operating and servicing
the steamer (36" at the front of the steamer and 15" above the steamer).
LEGS (OPTIONAL)
If the optional 4" adjustable legs are used, remove the four levelling feet on the bottom of the
steamer.
LEVELING
Using a spirit level or pan of water in bottom of steamer chamber, adjust feet to level steamer
front to back and side to side. After drain is connected, check for level by pouring water onto
the floor of the compartment. All water should drain through opening in rear.
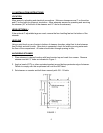
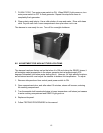
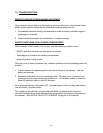
ANCHORING STEAMER
1. Place steamer in desired location with level counter top and mark four corners. Remove
steamer and drill ½" holes as indicated in Figure 1.
2. Apply a bead of RTV or other equivalent sealant around bottom perimeter edge of steamer.
Failure to comply with this requirement will void the NSF label.
3. Set steamer on counter and bolt down securely with 3/8 - 16 bolts.
FIGURE 1