


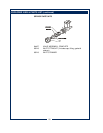

SERVICING INSTRUCTIONS (continued)
14
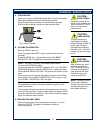
IMPORTANT:
Before setting assembly into
tank, make sure tank lid gasket
is properly seated on flange of
lid. DO NOT OVER-TIGHTEN.
IMPORTANT:
When mounting thermostat, be
sure to insert sensing bulb to
the bottom of the bulb well.
Tighten capillary lock nut only
enough to ensure no water
leakage. Excessive tightening
is not necessary.
IMPORTANT:
When replacing heating
element, also replace seal
gaskets.
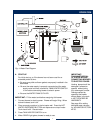
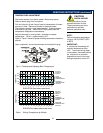
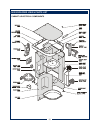
REMOVE TANK LID ASSEMBLY
Disconnect brewer from electric power. Turn OFF water supply.
Remove top panel. Pull vent tube, inlet elbow, outlet elbow and
water level probe out of basin pan.
Disconnect all wiring from thermostat, hi-limit, and heating
element.
Loosen nuts on tank hold-down strap. Remove hold-down strap
by sliding short slotted end off of locking stud and lifting it off.
Remove cover assembly by lifting it straight up.
Reassemble in reverse order.
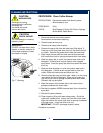
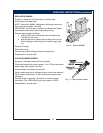
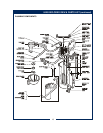
REPLACE THERMOSTAT (COTHERM)
Disconnect brewer from electric power. Turn OFF water supply.
Remove top panel.
Disconnect all wiring from thermostat only. Loosen and free jam
nut from pass-thru fitting securing temperature sensing bulb.
Remove two screws holding thermostat to bracket.
Lift out thermostat, sensing bulb and thermostat gasket.
Reassemble in reverse order. BE SURE the bulb well is fully
seated in the tank fitting, and that the temperature sensing bulb is
inserted to the very bottom of the bulb well.
REPLACE HEATING ELEMENT
Remove tank lid assembly per above.
Remove two hex nuts holding element to cover. Pull element
from mounting holes.
Reassemble in reverse order.