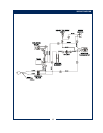
IMPORTANT: Adjust timer with
a full water bottle installed in the
bottle ring.
IMPORTANT: Before setting
assembly into tank, make sure
tank lid gasket is properly
seated on flange of lid.
DO NOT OVER-TIGHTEN.
IMPORTANT: When removing
tank lid assembly, be careful to
not damage or kink thermostat
capillary tube.
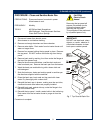
IMPORTANT: When mounting
thermostat, be sure a new seal
washer is placed below the
fitting on the capillary line.
Push sensing bulb thru tank lid
until fitting seats.
Tighten capillary lock nut only
enough to ensure no water
leakage. Excessive tightening
is not necessary.
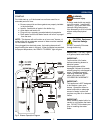
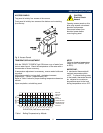
TIMER ADJUSTMENT
The amount of water dispensed automatically during a brew cycle
is controlled by the timer.
Place empty airpot under brew chamber. Press BREW button.
Brewer should dispense one airpot of water. To adjust amount:
Remove brew chamber and button plug. Adjust knob on timer;
clockwise increases time. Run several cycles to check amount of
water delivered. Replace button plug.
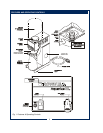
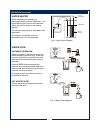
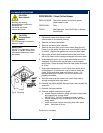
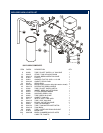
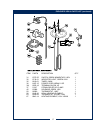
REMOVE TANK LID ASSEMBLY
Unplug brewer or turn circuit breaker OFF. Remove water bottle.
Run water from the hot water faucet until no more water flows
Remove top panel. Siphon water from the tank through the
faucet supply fitting until the water level in the tank is below the
tank lid.
Pull vent tube and inlet elbow out of basin pan. Remove basin
pan.
Disconnect faucet supply from tank lid.
Disconnect wires from thermostat. Remove screws holding
thermostat to bracket. Do not remove thermobulb from tank lid.
Disconnect all wiring from heating element. Slide hi-limit out of
the way.
Loosen center screw on tank hold-down bracket and loosen
acorn nuts. Remove hold-down bracket by sliding short slotted
end off of locking stud and lifting it off. Remove tank lid assembly
by lifting it straight up.
Reassemble in reverse order.
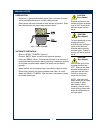
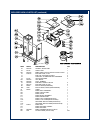
REPLACE THERMOSTAT
Unplug brewer or turn circuit breaker OFF. Remove water bottle
and drain water from hot water faucet until no more water flows.
Remove top panel.
Disconnect all wiring from thermostat only. Loosen and free jam
nut from pass-thru fitting securing temperature sensing bulb.
Remove two screws holding thermostat to bracket.
Lift out thermostat, sensing bulb and thermostat gasket.
Reassemble in reverse order.
12
SERVICING INSTRUCTIONS (continued)