


Installation
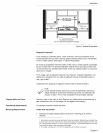
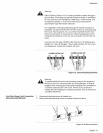
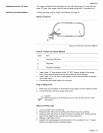
toverifythatbothbacklegsarerestingsolidlyonthefloor.Alsoverifythatthe
leftrangelegisundertheanti-tipbracket.
Caution:
Verifythattheweightoftherangeisnotrestingonthecountertop.
Thiscouldresultindamageto thecountertopandtheappliance.
Test for Gas Leaks
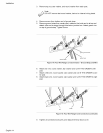
3. If the back legs are not resting solidly on the floor or the left leg is not under
the anti-tip bracket, slide range out, adjust legs and slide back in.
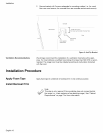
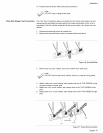
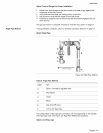
Adjust Front of Range for Proper Installation
1. Adjust front leveling legs so that the cooktop trim rests against the countertop
all the way around.
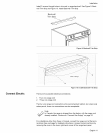
2. Verify that both front legs are resting solidly on the floor.
3. Use a level to verify that the range is level and plumb.
4. Push range back into position ensuring that range leg slides under the anti-tip
bracket. The range will sit 3/4" away from the wall when properly installed.
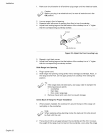
5. Carefully tip range forward to ensure that anti-tip bracket engages and pre-
vents tip-over.
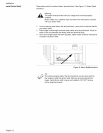
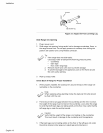
Complete Gas Connection
1. Connect pipe to range at union. Access the connection through the access
panel behind the drawer.
The gas connection is complete. Proceed to "Test for Gas Leaks" on page 21.
Leak testing is to be conducted by the installer according to the instructions given
in this section.
Note:
Be careful not to apply pressure to warming drawer element during
rigid pipe testing.
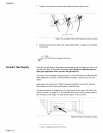
1. Turn on gas.
2. Apply a non-corrosive leak detection fluid. Include all joints and fittings
between the shutoff valve and the range. Include gas fittings and joints in the
range if connections may have been disturbed during installation.
3. Inspect for leaks. Bubbles appearing around fittings and connections
indicate a leak.
4. If a leak appears, turn off supply line gas shutoff valve and tighten connec-
tions.
5. Retest for leaks. Turn gas back on at supply line shutoff valve and reapply
leak detection fluid.
6. When no bubbles appear, test is complete. Wipe off all detection fluid residue.
Caution:
Never check for leaks with a flame.
Do not continue to the next step until all leaks are eliminated.
English 21