


16 17
6. For LOAF size, press the ▲ and ▼ buttons simultaneously
and hold; unit will beep and display will indicate loaf size
of (2) 1.0 lbs.
7. Press START to begin kneading cycle. The POWER light will
illuminate. The time remaining will begin to count down in
display window. Bread time and loaf size will be shown in
display window.
8. If additional ingredients are listed after the yeast, such
as nuts and fruits, listen for the beep near the end of the
kneading cycle, about 30 minutes into the program.
Add those ingredients.
Important: Do not use the automatic fruit and nut dispenser
with the 1-lb. bread pans.
9. Follow directions from step 12 to 15 in USING YOUR BREAD
MAKER to finish baking.
SLICING AND STORING BREAD
For best results, place bread on wire rack and allow to cool at
least 20 minutes before slicing. Use electric knife or serrated
knife for even slices.
Store unused bread, tightly sealed (sealable plastic bags or
plastic containers work well) at room temperature for up to
3 days. For longer storage, (up to 1 month) place bread in
sealed container in freezer. Since homemade bread has no
preservatives, it tends to dry out and become stale faster.
Leftover or slightly hardened bread may be cut into ½-inch
or 1-inch cubes and used in recipes to make croutons, bread
pudding or stuffing.
USING 15-HOUR DELAY BAKE TIMER
Important: Delay baking does not activate JAM cycle. Do not
use delay bake timer if your recipe includes perishables, such
as, eggs, fresh milk, yogurt
or other dairy products and meats, etc.
To preset your bread maker, follow these steps:
1. Add ingredients in the order listed as usual, taking care not
to let yeast and liquid ingredients contact one another.
Note: If your recipe contains salt, add it with the liquid
ingredients, taking care to keep it away from the yeast.
2. Close bread maker lid and plug it in.
3. Press MENU to choose cycle. Time needed for selected cycle
appears in display window.
4. Press ▲ to add time in 10-minute intervals. (Use ▼ to
subtract time.) Amount of time set is shown in display
window.
• To fast-forward time, continually press ▲ .
• To fast-reverse, continually press ▼ .
• For example, if it is 8:00 AM and you want bread ready at
1:00 PM, press ▲until the display reads 5:00 – meaning
it will finish baking in 5 hours. This is the hour difference
between 8:00 AM and 1:00 PM.
Note: Actual baking times will not change.
Note: If bread is not removed immediately after baking and
START/ STOP is not pressed, the Keep Warm mode will
begin. Bread maker will automatically turn off after
60 minutes. For best results, remove bread immediately
after baking.
Note: Keep Warm does not apply to the following cycles:
❏ Jam
❏ Dough
❏ Bake Only
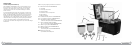
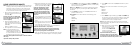
13. Turn bread pan upside down and
shake to release bread (H). Place
bread upright on wire rack to cool at
least 20 minutes before slicing.
Note: The collapsible kneading paddles
are designed to stay in the bread
pan instead of sticking in your
bread. Check to see if the paddles
stayed in the pan. If not, follow the
caution statements below when removing.
Caution: Be sure to remove kneading paddle from the
bread before serving.
Caution: Bread pan, kneading paddle and bread will be very
hot. Allow bread to cool before removing the paddle and
always use the paddle removal key.
14. Unplug unit and allow to cool completely before cleaning.
(See CARE AND CLEANING INSTRUCTIONS.)
Important: Make sure to clean the inside of the baking
chamber thoroughly after each use.
15. Once bread has cooled (approximately 2 hours) store in an
airtight container.
BAKING ONE POUND LOAVES
Important: You can bake either one or two breads at a time,
as desired. The recipe book contains recipes for White, Whole
Wheat , French, Sweet, Low Carb and Gluten Free 1-lb. loaves
(see 1-lb. loaves recipe section at the back of the recipe book).
1. Open lid and remove traditional bread pan
(if stored in appliance.)
Caution: Do not turn or shake bread pan while taking it out.
If the bread pan is bent, temperature sensor may not work
properly.
2. Insert one of the two non-collapsible kneading paddles (do
not use collapsible paddles) into each of the 1-lb. bread
pans. Position kneading paddle on the drive shaft. Match
flat side of drive shaft to flat part of hole in kneading paddle.
Make sure paddle is secure.
3. Follow steps 3 and 4 in USING YOUR BREAD MAKER to add
ingredients.
4. Insert one bread pan over each drive coupling in the baking
chamber and press down on rim of bread pan until it snaps
securely in place.
5. Follow steps 5 through 9 in USING YOUR BREAD MAKER to
begin setting programming.
H