


5
COFFEE GRINDING
1. Visually inspect the hopper for an ample supply of whole bean coffee.
2. Place a paper filter into the brew funnel. The filter must not be folded-over or tilted to one side.
3. Insert the funnel into the funnel rails until it stops.
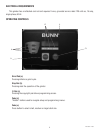
4. Select batch size desired (e).
5. Momentarily press the “START” switch (a). The grinding will begin after a moment. The actual weight of the
coffee being ground into the funnel will be shown on the display during grinding. The grinder will automati-
cally stop when the correct weight is reached. DO NOT TOUCH THE FUNNEL OR FUNNEL HANDLE DURING
GRINDING. THIS WILL CAUSE THE INCORRECT WEIGHT OF COFFEE TO BE GROUND.
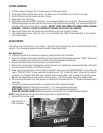
6. Remove the funnel from the grinder and level the bed of grounds by gently shaking.
7. The loaded funnel is now ready for use in any commercial drip coffee brewer according to the manufac-
turer’s instructions.
ADJUSTMENTS
The grind can be set from fine to very coarse. The grind may be adjusted for use in most commercial coffee
brewers. The following procedures should be used to make adjustments.
Burr Adjustment
1. Unplug the grinder and remove the hopper by pulling forward with the handle.
2. Plug-in the grinder, place funnel with filter into the funnel rails. Momentarily press the “START” button and
release, run grind cycles until all of the coffee in the grind chamber is dispensed.
3. Remove two black screws from the lower control panel bezel.
4. Remove the control panel and hang the control panel on front of grinder by inserting metal tabs on the back
of control panel into slots on the front of grinder.
5. Make sure funnel with filter is still in place in the funnel rails. Go to the “GRIND MOTOR” menu under the
level 1 “SERVICE TOOL?” menu, and press the button under “ON” to start the motor. Slowly turn the adjust-
ing screw in a clockwise direction until a metallic whine is heard due to the rubbing of the grinding burrs.
Reverse the adjusting screw just until the whining stops. Turn off the motor and exit to home screen.
6. Remove the white plastic cap, and replace it on the end of the grinder with the “0” aligned with the adjusting
screw slot.
7. The following settings approximately correspond to the CBC recognized grinds.
FINE GRIND: Rotate the adjusting screw to the “7” in a counterclockwise direction.
DRIP GRIND: Rotate the adjusting screw to the “8” in a counterclockwise direction.
REGULAR (COARSE) GRIND: Rotate the adjusting screw to the “12” counterclockwise direction.
NOTE: Exact adjustment will vary according to bean roast or added flavoring
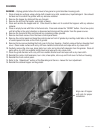
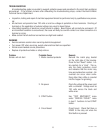
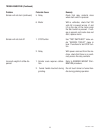
8. Reinstall front control panel.
Tabs into slots on
front of grinder.
41451.0001 111909