


1 cup coffee: 5 oz.
2 cup coffee: 5 oz. per cup, total of 10 oz.
All four settings can be re-programmed to your personal
preferences (see chapter 9d)
• The grinder can be set during grinding to grind approximately
between 5 and 9 seconds, producing a milder or stronger coffee
beverage (see chapter 9b)
• The water hardness is set to level 2. If softer or harder water is
used, the hardness can be changed (see chapters 14a, 14b).
• The Auto-Off feature is set to 2 hours after last use.
See chapter 8b how to change the Auto-Off setting.
6. PREPARING THE MACHINE FOR THE FIRST TIME
• Make sure all accessories, literature and any other items are
removed from the bean container and the water tank.
• DO NOT install the Clearyl Blue water filter now (chapter 15a).
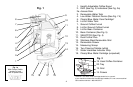
• Make sure the machine sits on an even, flat surface and the
drawer and used coffee container are inserted (Fig. 1 and Fig. 2).
• Plug in machine.
6a. FILLING THE WATER TANK
Please note: Only use fresh, cold water. Never fill water tank
with carbonated water, milk or any other liquid.
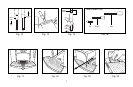
• Remove the water tank (Fig. 7), rinse and fill with cold water.
• Replace water tank and make sure that it engages securely.
We recommend to fill the water tank each day with fresh, cold
water. This will improve the flavor of your coffee.
6b. FILLING THE BEAN CONTAINER
Please note: To ensure that the conical burr grinder continues to
function properly, please avoid using any kind of coated or
flavored beans (all coating and flavors contain sugar or sugar
substances). Such coating can damage the burrs. Using such
beans voids the warranty. Have your coffee store grind the sugar
coated beans and use as described in chapter 9f.
Flavored Coffee: If you like flavored coffees we recommend
adding flavors to your coffee after brewing. This way you can
use your regular coffee beans in the bean container. Adding the
flavors after brewing lets you control the flavor intensity much
better than with pre-flavored coffee. Your local coffee store
typically carries a variety of liquid flavors.
Frozen Beans: Thaw 3 to 4 hours before adding to bean container.
This prevents moisture from seeping into the grinder.
Oily Beans: Beans with an oily surface tend to stick together.
This may prevent a continuous flow of beans from the bean
container into the burrs. As a result the grinder does not grind
enough coffee and you might get weak or no coffee at all.
Stir the beans in the bean container just before grinding.
Alternatively, you can also pour the beans into an open bowl and
let them sit for about 5 hours. The oils will evaporate (this will
not change the taste of your coffee). Then fill the beans into the
bean grinder. Now beans will feed into the burrs more easily.
• Open the lid for the bean container and remove the Aroma
Protection Lid.
• Make sure the bean container is empty and clean. Fill beans
into the bean container (Fig. 5).
6c. TURNING THE MACHINE ON FOR THE FIRST TIME
Make sure bean container and water tank are filled.
• Switch the Main Power Switch (Fig. 1a) in the back of the
11.