Installation Instructions
CONTENTS
Page
SAFETY CONSIDERATIONS ...................1
INTRODUCTION ..............................1
INSTALLATION .............................1-27
Step 1 — Inspect Shipment ...................1
Step 2 — Rig and Place Unit ..................1
Step 3 — Piping Connections .................9
• COOLER FLUID, VENT, AND DRAIN
• BRINE UNITS
• PREPARATION FOR YEAR-ROUND
OPERATION
• 30HXA REFRIGERANT PIPING
• 30HXC CONDENSER CONNECTIONS
• INSTALL PRESSURE RELIEF REFRIGERANT
VENT PIPING
Step 4 — Make Electrical Connections .......14
• FIELD POWER CONNECTIONS
• FIELD CONTROL POWER CONNECTIONS
Step 5 — Install Accessories ................26
• ELECTRICAL
• 30HXA LOW-AMBIENT OPERATION
• MINIMUM LOAD ACCESSORY
• MISCELLANEOUS ACCESSORIES
Step 6 — Leak Test Unit .....................26
• 30HXC UNITS
• 30HXA UNITS
Step 7 — Refrigerant Charge ................26
• 30HXC UNITS
• 30HXA UNITS
SAFETY CONSIDERATIONS
Installing, starting up, and servicing this equipment can
be hazardous due to system pressures, electrical compo-
nents, and equipment location. Only trained, qualified
installers and service mechanics should install, start up, and
service this equipment.
When working on the equipment, observe precautions in
the literature, and on tags, stickers, and labels attached to the
equipment.
• Follow all safety codes.
• Wear safety glasses and work gloves.
• Use care in handling, rigging, and setting bulky
equipment.
INTRODUCTION
These instructions cover installation of 30HX liquid chill-
ers with electronic controls and units with factory-installed
options (FIOPSs).
IMPORTANT: This equipment generates, uses, and can
radiate radio frequency energy. If not installed and
used in accordance with these instructions, this equip-
ment may cause radio interference. The equipment has
been tested and found to comply with the limits of a
Class A computing device as defined by the FCC
(Federal Communications Commission, U.S.A.) Regu-
lations, Subpart J of Part 15, which are designed to
provide reasonable protection against such interfer-
ence when operated in a commercial environment.
INSTALLATION
Step 1 — Inspect Shipment —
Inspect unit for dam-
age upon arrival. If damage is found, file a claim with the
shipping company right away. Do not store units in an area
exposed to weather because of sensitive control mecha-
nisms and electronic devices.
Locate unit indoors. When considering unit location, con-
sult National Electrical Code (NEC, U.S.A.) and local code
requirements. Allow sufficient space for wiring, piping, and
service. Install unit in an area which will not be exposed to
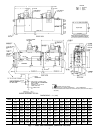
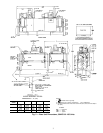
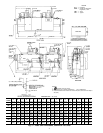
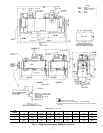
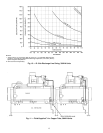
subfreezing weather. See Fig. 1-4 for clearance details.
Allow the following clearances for service access:
Front .............................. 3ft(914 mm)
Rear ............................... 3ft(914 mm)
Top ............................... 2ft(610 mm)
Ends ............... tube removal at one (either) end;
3 ft (914 mm) at opposite end.
Be sure surface beneath the unit is level and is capable of
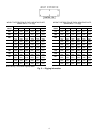
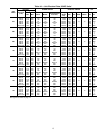
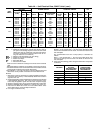
supporting the operating weight of the unit. See Fig. 5 and
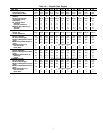
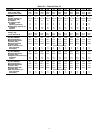
Tables 1A and 1B for unit operating weights. If necessary,
add supporting structure (steel beams or reinforced concrete
slabs) to floor to transfer weight to nearest beams.
Step 2 — Rig and Place Unit
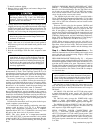
Rig unit from the top heat exchanger only. Rigging from
the bottom heat exchanger will cause the unit to be lifted
unsafely. Personal injury or damage to the unit may
occur.
Do not remove unit from skid until unit is in its
final location. Rig from the rigging holes provided in the top
heat exchanger. See Fig. 1-5 for rigging and center of grav-
ity information. Lower the unit carefully onto the floor or
roller. Push or pull only on the skid, not the unit. If the
unit is moved on rollers, use a minimum of 3 evenly-spaced
rollers.
Copy continued on page 9.
30HXA,HXC076-186
Water-Cooled and Condenserless Chillers
50/60 Hz
Manufacturer reserves the right to discontinue, or change at any time, specifications or designs without notice and without incurring obligations.
Book 2
Tab 5c
PC 903 Catalog No. 563-052 Printed in U.S.A. Form 30HX-1SI Pg 1 5-96 Replaces: New


