


Top Oven
8
To use the Top
Oven
Lighting the burner
Guidance on using
the Top Oven
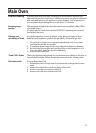
1. Best results are obtained by pre - heating for about fifteen minutes.
2. The tray or dish on which the food is cooked should be pushed to the
back of the shelf.
3. Food which is higher than or will rise above 100mm (4") cannot be
cooked in the top oven.
Never place dishes on the oven base over the burner.
An odour may be noticed when first using the oven - this should cease
after a short period of use.
The burner control should not be operated for more than 15 seconds. If
after 15 seconds the burner has not lit, turn off the burner control and do
not attempt to re - ignite the burner for at least one minute.
In the event of the burner flames being accidentally extinguished, turn
off the burner control and do not attempt to re-ignite the burner for at
least one minute.
The top oven can be used to cook small quantities of food or used in
conjunction with the main oven to provide additional cooking space.
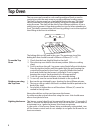
The shelf in the top oven has a heat shield fitted at the rear. The shield
can be removed for cleaning and grilling, but must be replaced when
using the oven. The shelf can be used in two different positions. It has a
safety stop to prevent it from being pulled out too far when attending to
food. The shelf is removed from the oven by pulling it out to the stop and
then lifting at the front to withdraw.
The baking dish can be used in the oven. The maximum size of the
baking dish that should be used is 300mm x 330mm (12" x 13")
1. Check that the heat shield is fitted to the shelf.
2. Place the top oven shelf in the chosen position. (Refer to cooking
chart)
3. Push in and turn the grill / top oven control knob fully anti-clockwise.
Press the ignition button until the sparks light the gas, keeping the
control knob pushed in for at least 5 seconds. Release the control
knob and check that the burner is still alight. If not try again,
keeping the control knob pushed in for a longer period.
4. Turn the control knob clockwise to the required setting.
5. To turn off, turn the control knob clockwise to the symbol O