


12
You should hear the dishwasher drain and then begin
to fill with water. Wait approximately two minutes, then
carefully open the door to verify water is filling the
dishwasher tank. If there is water present, close the
door and continue the process. Should the water not fill
the tank or the pump is not running, then immediately
push the START/STOP button to stop the dishwasher
and verify that the water source is turned on and that
the power cord is plugged in with the main power on.
Check for leaks under the dishwasher. If any leaks are
found, turn off the power supply, tighten all connections
and restore the power.
Check for leaks around the door. A leak around the
door could be caused by the dishwasher door rubbing
or hitting against adjacent cabinets. Reposition the
dishwasher if necessary.
The dishwasher will drain after the first fill. Check the
drain line for leaks. If leaks are found, turn off the
power supply, tighten all connections and restore the
power.
Open the dishwasher door and verify that most of the
water has drained. If not, verify that the disposer plug
has been removed and/or the air gap is not plugged.
Run the dishwasher through another fill and drain
cycle. Verify that there are no leaks.
For additional start up or drain problems check
all installation steps to verify they are correct and
complete. If the dishwasher still does not operate
correctly stop immediately and contact the local
authorized Dacor service agent.
If the fill, wash and drain cycles operate properly,
reinstall the toe kick mounting plate.
Adjust the toe kick to cover legs and snap it into place
on the toe kick mounting plate.
If the dishwasher fails to operate properly:
Verify that power is supplied to the dishwasher.
Check the electrical connections to ensure that the
installation has been completed correctly.
Repeat the above test.
If the appliance still does not work, contact an
authorized Dacor service company at (800) 793-0093.
Do not attempt to repair the appliance yourself. Dacor
is not responsible for service required to correct a faulty
installation.
□
□
□
□
□
□
□
□
□
•
•
•
•
Installation Instructions
Verifying Proper Operation (Continued)
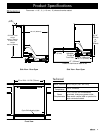
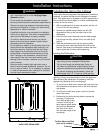
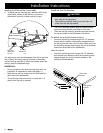
Adjusting and Installing the Included Toe Kick
The the height and depth of the included toe kick are
adjustable.
Adjust the toe kick height. The
typical toe kick height is 4”
high. For other than a typical
installations, remove the rear
assembly screws that hold the two
toe kick sections together. Adjust
the toe kick sections to match
your desired toe kick height and
reinstall the assembly screws.
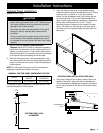
Snap the toe kick into the toe kick
mounting plate.
Install the entire toe kick assembly
by inserting the depth adjustment pins into the chassis
and pushing straight back on both sides until the front
of the toe kick aligns with the adjacent cabinet toe kick.
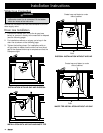
Installing a Custom Toe Kick (Model ID30)
See the Custom Panel Installation Template (Dacor PN
101394) for complete installation instructions of a custom
toe kick panel. Use the included stainless steel toe kick as
a mounting surface.
Apply high tack double stick tape to the front of the
stainless steel toe kick.
Attach the custom toe kick to the stainless steel toe
kick. If necessary, screw holes are provided through the
front of the toe kick for material purposes.
Snap the toe kick assembly into the toe kick mounting
plate.
Install the entire toe kick assembly by inserting the
depth adjustment pins into the chassis and pushing
straight back on both sides until the front of the toe kick
aligns with the adjacent cabinet toe kick.
1.
2.
3.
1.
2.
3.
4.
Adjustment
Pins
Toe Kick
Mounting
Plate
Door
Side of
unit