


7
Installation Instructions
WARNING
Do not connect the electrical, water inlet or drain
until instructed to do so in the Verifying Proper
Operation section.
Do not install the dishwasher unless the electrical
service provided meets the dishwasher specifications.
Observe all governing codes and ordinances during
planning and installation. Contact your local building
department for further information.
A qualified technician must complete the installation
of this built-in appliance. The owner is responsible to
make sure the dishwasher is properly installed.
To avoid an electrical shock hazard, turn off the
power at the main fuse or breaker location before
proceeding with the installation.
Do not allow any material or the electrical cord to be
directly behind the dishwasher while pushing it into
the cut-out opening. Carefully feed the drain hose,
water supply line and electrical cord into the utility
access holes in the cabinet sides without pinching
them. Damage to the dishwasher, electrical wires,
water supply lines, drain lines and resulting water
damage, due to improper installation are not covered
under warranty.
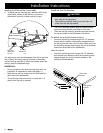
Keep the factory installed high loop drain hose in
place to ensure proper dishwasher operation. Do not
cut, tie, strap or lower it. If it is necessary to lengthen
it, install an aftermarket drain extension kit, available
at most home improvement stores.
•
•
•
•
•
•
•
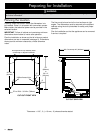
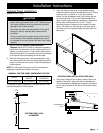
Installing the Unit in the Cabinet
Care should be exercised when the appliance is installed or
removed, to reduce the likelihood of damage to the power
cord. If the power cord is damaged it must be replaced by a
Dacor Authorized Service Agent, or similar qualified person,
in order to avoid a hazard.
With the assistance of at least one person, set the unit
in front of the cut-out opening.
Connect the flexible braided water line with 3/8”
compression fitting to the hot water inlet on the
dishwasher.
Feed the drain hose, electrical cord and water supply
line through the utility access hole in the side of the
cabinet.
Slide the dishwasher back into the opening while
pushing the drain, water and electrical lines into the
cabinet. Stop when the dishwasher contacts the back
wall or aligns with the front cabinet opening.
Leveling the Dishwasher
CAUTION
Do not use a power driver to adjust the rear leveling
legs, doing so may damage the dishwasher.
Do not over torque the leveling legs. Doing so
will distort the dishwasher chassis leading to door
alignment problems and possible water damage.
To prevent damaging the dishwasher, adjust the
leveling legs only 1/2” (13 mm) at a time, per leg.
•
•
•
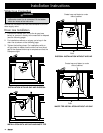
To align the dishwasher correctly inside the cabinet
opening, the legs must be adjusted to level the appliance.
After centering the appliance in the opening, level the
appliance by adjusting all four leveling legs.
To verify front to back level, remove the lower rack from
the dishwasher and place a level on the tank side wall
rack guides.
To verify left to right level, place a level on the tank
lower front frame.
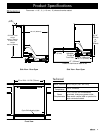
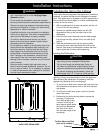
Remove the toe kick mounting plate to expose the
front legs. To adjust the
front leveling legs, place
a wrench on the top of
each leg and adjust where
the top of the dishwasher
tank front trim is flush
with the lower edge of the
countertop.
1.
2.
3.
4.
1.
2.
3.
HIGH LOOP DRAIN HOSE
Front leg
Toe Kick Mounting Plate
(pull out to remove)