


23
OVEN USE
12” OVEN PROOF MODE
This feature of the 12” Oven maintains a warm, draft free environment useful for proofing yeast leavened
products.
SETTING THE 12” OVEN FOR PROOFING
1. Place dough in dish in the small oven.
2. Press “PROOF” Selector button
■
The “OVEN ON” light and oven interior lights turn on.
■
The “HEATING” light will not turn on in the proofing mode. The thermostat dial setting does not effect the
proof temperature.
■
The ideal temperature for proofing will be maintained until the “OFF” button is depressed.
3. Set a Minute timer for less than the minimum proof time.
NOTES:
A) Do Not Open the Oven Door unnecessarily as doing so will lower the oven temperature and lengthen proofing
time.
B) Proofing time may be decreased when using the large oven at the same time you are proofing. Check bread
product early to avoid over-proofing. If you are using the large oven for extended periods of time, we
recommend, for optimum results, that you complete the proofing before turning the large oven on.
■
DO NOT use the proofing oven for warming food or keeping food hot. The proofing oven temperature is not
hot enough to hold foods at safe temperatures (above 140
0
F).
OVEN SELF-CLEANING MODE (LARGE OVEN ONLY)
The self-cleaning oven of your new range features pyrolytic self-cleaning. When set in the clean mode, the oven
reaches a high temperature that burns off the food soil. When the oven is set for clean, only the cooktop
burners may be used. The 12” Electric Proofing Oven, the griddle and/or the grill cannot be used. It is common
to see smoke and/or flames during the clean cycle, depending on the content and amount of soil remaining in
the oven. If a flame persists, turn off the oven and allow it to cool before opening the door to wipe up the
excessive food soil. At the end of the clean cycle, some gray ash or burned residue may remain inside the oven.
This is a mineral deposit that does not burn or melt. The amount of ash depends on how heavily soiled the oven
was before the oven was cleaned. It is easily removed, once the oven has cooled, using a damp paper towel,
sponge, or cloth. Wipe off any smoke residue that remains on the front frame with Formula 409® or Fantastik®.
If stain remains, use a mild liquid cleanser. The amount of smoke stain is directly related to the amount of food
soil left in the oven at the time of self-cleaning. Clean the oven often.
OVEN DOOR LOCK DURING SELF-CLEAN
When the clean cycle starts, the lock light turns on, and the automatic door lock cycle begins. Do Not attempt
to open the door when the lock light is on. You can stop the cycle by pushing the off button. The lock light will
turn off only after the oven has cooled below 550ºF, and the automatic door lock has completed its cycle to the
open position.
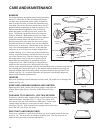
BEFORE SELF-CLEANING THE OVEN:
■ Remove all utensils and racks
■ Clean the oven front frame and outer door edges. Wipe up large spillovers and grease. (see Fig. 14)
■ Be sure the light bulbs and glass covers are in place.
■ Turn on the ventilator hood above the range (if one is installed) and leave it on until after the oven has
completed the self-clean cycle.