


PAGE 3 OF 16
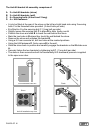
The Anti-tilt bracket kit assembly comprises of:
A 2 x Anti-tilt brackets (stove)
B 2 x Anti-tilt brackets (wall)
C 6 x Securing bolts (4 short and 2 long)
D 4 x Hilti fasteners
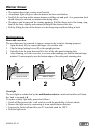
• A is to be fitted at the rear of the stove on the left and right hand side using 2 securing
bolts C in the threaded holes provided. (2 short bolts per side).
• B is fitted to A by the securing bolt C (1 long bolt per side).
• Slightly loosen the securing bolt C to allow B to slide freely over A
• Position the stove and slide B to touch the wall behind the stove.
• Mark the two holes in B where they touch the wall behind the stove.
• Remove the stove and unfasten the bracket B.
• Using a 6.0 mm concrete bit, drill two holes at the marked positions.
• Using the Hilti fasteners D, firmly secure B to the wall.
• Slide the stove back in position and carefully engage the brackets so that B slides over
A.
• Securely fasten the two brackets by tightening bolt C. (1 long bolt per side)
• The stove is then secured and will not accidentally tilt if downward pressure is applied
to the open oven door.
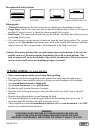
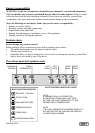
Anti-tilt installation top view
Stove
A
A
B
C
B
C
Wall
Stove
Wall
Anti-tilt installation side view
B
C
A
A
B
C
D
Parts
A
C
B
Assembly