


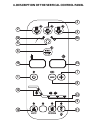
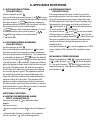

5.1 STARTING UP THE APPLIANCE (only for T14D / T20C / T24C / T40)
PRE HEATING FUNCTION OF COMPRESSOR SUP
When power is initially supplied to the cabinet, a 2-hour pre-heating phase starts and the display shows
some blinking dashes “---”. During this phase the machine cannot be started. This important information is
shown on a yellow label placed inside the door.
Initial pre-heating is necessary in order to safeguard the compressor’s life. Only if strictly necessary (and
under the customer’s responsibility) it is possible to by-pass countdown by pressing push button “Printer/
HACCP” for about 5 seconds.
This function is not activated if machine stops/starts operating due to lack of power during working cycle.
When the appliance is powered up, it can be:
• ON displays 15 and 16 and left LED 5A on push-button 5 on, LED 1
o
• OFF-STAND-BY LED on push-button 1 on
To switch from one status to another, press push-button 1 .
Whenever the appliance switches from STAND-BY status to ON, a self-test is carried out: all LEDs and displays
are switched on, push-buttons are checked, then the installed software version is displayed.
OPERATION
The main work cycles (chilling/freezing) performed by the appliance:
• SOFT BLAST CHILLING (+38°F / +3°C)
Pre-cooked food is rapidly chilled (90’) to a temperature of +38°F / +3°C, thus preventing proliferation
of bacteria and preventing dehydration of the cooked food due to evaporation. Food can
thus be stored perfectly for 5 to 7 days without altering its original qualities. The soft cycle is recommended
for delicate, thin foods such as rice, vegetables and fried foods.
• HARD BLAST CHILLING (+38°F / +3°C)
This process is designed to cool food products with a thickness greater than 2-3 cm/1’’ and is very eective
for dense, greasy or large-sized foods. Variable air temperatures are used to accelerate penetration of cold
into the product.
• BLAST FREEZING (0°F / -18°C)
This function freezes the product completely to a temperature of 0°F / -18°C in approximately 4 hours.
The rapidity of the process prevents formation of macrocrystals essential to ensure that the product
retains its original consistency and quality when thawed for consumption.
• AUTOMATIC CONSERVATION
At the end of each cycle (chilling or freezing), the appliance will automatically switch to the
required storage temperature.
Two dierent end-cycle modes are available for each cycle:
• BY TEMPERATURE - the cycle ends when the probe reaches the required temperature.
• TIMED - cycle length is pre-set
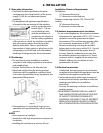
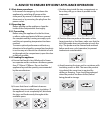
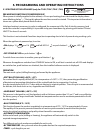
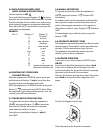
4.1
PUSH-BUTTONS
:
1.
ON /OFF (STAND BY)
2.
SOFT BLAST CHILLING CYCLE (+38°F / +3°C)
3.
HARD BLAST CHILLING CYCLE (+38°F / +3°C)
4.
BLAST FREEZING CYCLE (0°F / -18°C)
5.
END CYCLE BY TIME / PROBE (TEMPERATURE)
5A.
PROBE CHILLING INDICATOR LED
5B.
TIMED CHILLING INDICATOR LED
6.
CYCLE START / STOP
7.
INCREASE VALUE
8.
DECREASE VALUE
9.
RECIPE PROGRAMS (CHILLING CYCLES)
10.
HACCP AND PRINTER (OPTIONAL)
11.
DEFROSTING / FORCED VENTILATION
12.
CHILLING / FREEZING CYCLE INDICATOR LED
13.
STORAGE INDICATOR LED
14.
TIME DISPLAY
15.
TEMPERATURE DISPLAY
oC
HACCP
PROGRAM
0o
+38o
HARD
+38o
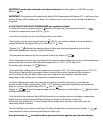
5. PROGRAMMING AND OPERATING INSTRUCTIONS
GB
27
The information and instructions given in this
section address all persons operating the appli-
ance: the user, the maintenance technician and
non-specialised personnel.
Ensure that the electrical power to the sys-
tem has been disconnected before carrying
out any cleaning or maintenance work on the
appliance.
8.1 GENERAL SAFETY REGULATIONS
Recall the following regulations to ensure
that all cleaning and routine maintenance
operations are conducted safely.
- do not touch the machine with moist or wet
hands or feet;
- never operate the machine while barefoot; -
do not insert screwdrivers, cooking utensils
or any other object between the guards and
moving parts.
- before performing cleaning or routine main-
tenance operations, disconnect the
machine from the power supply at the mas-
ter switch and by pulling out the plug;
- never pull on the power cable to disconnect
the machine from the power supply.
Removal of guards and safety devices for
the purposes of routine maintenance is
strictly prohibited. The manufacturer
declines all responsibility for accidents
causedby failure to observe the above reg-
ulation.
Before starting up the appliance, clean the
inside of the cell thoroughly, as described in
par. 3.2.
8.2 CLEANING THE CONDENSER
To ensure correct and efficient air con-
denser operation, it must be kept clean to
allow free circulation of air. This operation
should be performed at least once a month.
Use a non-metal brush to remove all dust
and debris from the condenser blades.
Use a vacuum cleaner to prevent the dust
removed from being dispersed in the sur-
rounding area. To remove greasy deposits,
use a brush dipped in alcohol.
NEVER USE POINTED OR ABRASIVE
INSTRUMENTS TO SCRAPE APPLIANCE
SURFACES.
PERFORM THIS OPERATION ONLY
AFTER THE APPLIANCE HAS BEEN
SHUT DOWN
IMPORTANT
The condenser has sharp edges. Always wear
protective gloves, goggles and masks when
carrying out the above operations.
8. MAINTENANCE AND CLEANING
W
W
A
A
R
R
N
N
I
I
N
N
G
G
!
!
!
!
!
!
THESE OPERATIONS MUST BE PERFORMED
BY A CERTIFIED INSTALLATION
TECHNICIAN ONLY.