


8
SAFETY PRECAUTIONS
• This appliance is designed to make coffee and other
hot beverages:
Be careful not to burn yourself with sprays of hot
water or steam, or by using the machine improperly.
• This appliance is designed for household use only.
Any other use is considered improper and therefore
dangerous.
• The manufacturer may not be held liable for any
damage caused by improper, incorrect, or
unreasonable use.
• When using the appliance, do not touch the hot
surfaces. Use knobs or handles.
• Never touch the appliance with wet or damp hands
or feet.
• Do not allow children or unfit persons to use the
appliance unsupervised.
•Never allow children to play with the appliance.
• In the event of failure or malfunction, switch off the
appliance and do not tamper with it in any way.
If the appliance requires repair, contact an
authorized De’Longhi service center and ask for
original spare parts to be used.
Failure to observe these safety precautions could
jeopardize the safety of the appliance.
INSTALLATION
• After removing the packaging, make sure the product is
complete and in perfect condition.
If in doubt, do not use the appliance and contact
qualified De’Longhi personnel only.
• The packing elements (plastic bags, Styrofoam, etc.)
should be kept out of the reach of children, as they are
safety hazards.
• Place the appliance on a firm level surface far from
water faucets, sinks, and heat sources.
• When positioning the appliance on the counter, make
sure to leave a space of at least 2 in. (5 cm) between the
appliance and the walls or objects beside and behind it,
and at least 8 in. (20 cm) above it.
• Never install the appliance in a room where the
temperature may reach 32°F (0°C) or lower (the
appliance may be damaged if the water freezes).
• Check that the voltage of the electrical mains
corresponds to the voltage shown on the appliance
rating plate.
Connect the appliance only to an efficiently grounded
outlet with a minimum rating of 10A only.
The manufacturer may not be considered liable for
possible incidents caused by the failure to adequately
ground the outlet.
• If the power socket does not match the plug on the
appliance, have the socket replaced with a suitable type
by a qualified electrician.
• The power cord on this appliance must not be replaced
by the user, as this operation requires the use of special
tools.
If the cable is damaged or needs to be replaced, contact
an authorized De’Longhi service center only in order to
avoid all risks.
HOW TO MAKE DRIP COFFEE
SETTING THE CLOCK
When the coffee machine is connected to the outlet for
the first time, the numbers 0:00 will flash on the
display.
To set the time, proceed as follows:
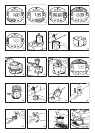
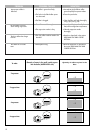
1. Press the "HOUR" button (Fig. 1) for about 2
seconds until the number of hours on the display
begins to increase.
2. Before the display stops flashing (about 5 seconds),
set the hour by pressing the HOUR button
repeatedly.
3. Set the minutes by pressing the MIN button (Fig. 2)
repeatedly. (To speed up the operation, hold the
button down.)
4. After setting the time, wait 5 seconds. When the
display stops flashing, the time set is stored.
To reset the time, press the HOUR button for about
2 seconds, and then follow the procedure as
described starting from point 2.
In the event of a temporary power failure, the time
set does not remain stored in the memory.
PROGRAMMING THE AUTOMATIC START
(AUTO BUTTON)
The appliance can be programmed to make drip coffee
automatically.
First, make sure that the time is set correctly.
To set the delayed start (i.e. the time you want the
coffee to be made), proceed as follows:
1. Press the AUTO button (Fig. 3) for about 2 seconds
until 0:00 flashes on the display.
2. Before the display stops flashing (about 5 seconds),
set the desired hour by pressing the HOUR button
repeatedly.
3. Set the minutes by pressing the MIN button
repeatedly.
4. After 5 seconds, the display will stop flashing and
the programmed time will be stored.
5. After you have programmed the machine as
described above, just press the AUTO button to
have coffee made at the time set (the AUTO
indicator light will illuminate).