


www.desatech.com
118197-01C4
D
RW
FW
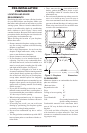
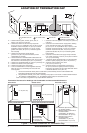
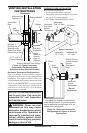
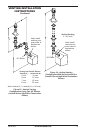
Figure 2 - Common Fireplace Locations
Flush with a wall
Through exterior wall
enclosed in a chase
Corner
installation
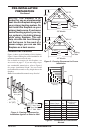
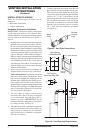
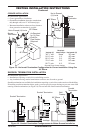
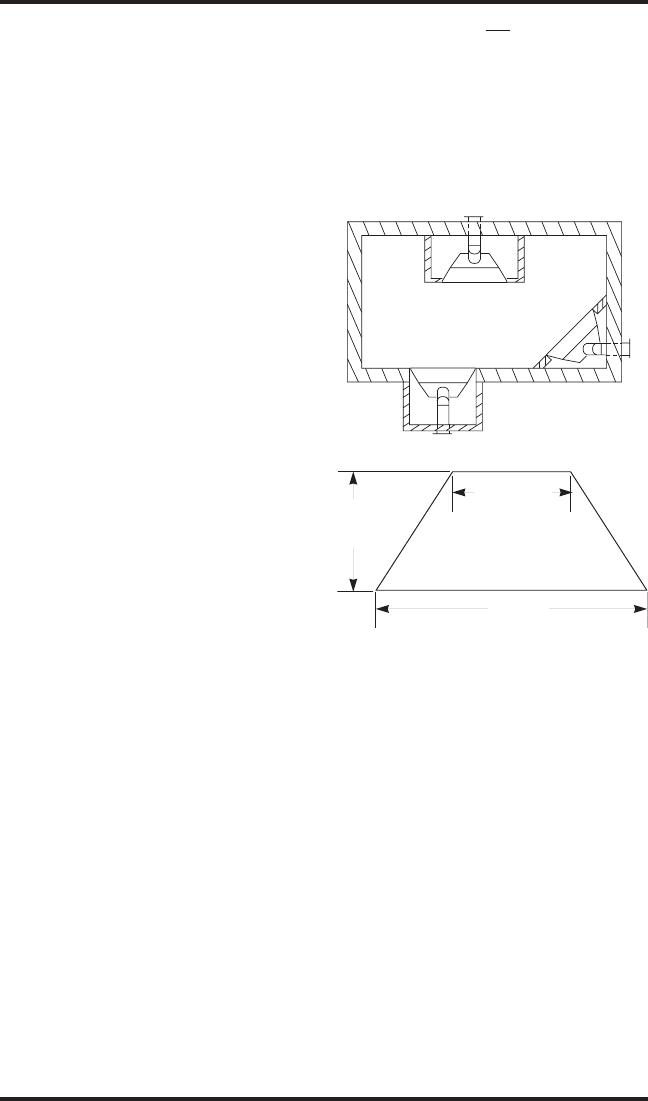
Figure 3 - Fireplace Bottom Dimensions
29" (36")
36
1
/4" (42")
41" (36")
48" (42")
• Theremustnotbeanyobstructionsuchas
bushes,gardensheds,fences,decksorutil-
itybuildingswithin24"fromthefrontofthe
terminationcap.
• Donotlocateterminationcapwhereexcessive
snoworicebuildupmayoccur.Besureto
clearventterminationareaaftersnowfallsto
preventaccidentalblockageofventingsystem.
Whenusingsnowblowers,donotdirectsnow
towardsventterminationarea.
PRE-INSTALLATION
PREPARATION
Determinethesafestandmostefcientlocation
foryourDESAdirect-ventreplace.Makesure
thatraftersandwallstudsarenotinthewayofthe
ventingsystem.Choosealocationwheretheheat
outputisnotaffectedbydrafts,airconditioning
ducts,windowsordoors.Figure2showssome
commonlocations.Beawareofallrestrictionsand
precautionsbeforedecidingtheexactlocationfor
yourreplaceandterminationcap.
Whendecidingthelocationofyourreplace,
followtheserules:
• Donotconnectthisreplaceventingtoachim-
neyueservingaseparatesolid-fuelburning
replaceorappliance.
• Duetohightemperatures,donotlocatethis
replaceinhightrafcareas,windyordrafty
areasornearfurnitureordraperies.
• Properclearancesmustbemaintained.
• Ifyourreplaceistobeinstalleddirectlyon
carpeting,vinyltileoranycombustiblemate-
rialotherthanwood,itmustbeinstalledona
metalorwoodpanelextendingthefullwidth
anddepthofthereplace.SeeFigure3.
• Yourreplaceisdesignedtobeusedinzero
clearanceinstallations.Wallorframingmaterial
canbeplaceddirectlyagainstanyexteriorsur-
faceontheback,sidesortopofyourreplace,
exceptwherestandoffspacersareintegrally
attached.Ifstandoffspacersareattachedtoyour
replace,thesespacerscanbeplaceddirectly
againstwallorframingmaterial.Seeframing
detailsonpage5.
• Ifyouplanoninstallingatelevisionorenter-
tainmentcenterrecessedaboveyourreplace,it
isrecommendedthatyoumaintainaminimum
18"abovetopoflouveropening.
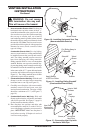
• Whenlocatingterminationcap,itisimportant
toobservetheminimumclearancesshownin
Figure7,page8.
• Ifrecessingintoawall,youcanavoidextra
framingbypositioningyourreplaceagainst
analreadyexistingframingmember.
• Donotrecessterminationcapintoawallor
siding.
• Youmaypainttheterminationcapwith450ºF
heat-resistantpainttocoordinatewiththeex-
teriornish.
Minimumclearancestocombustiblesforthere-
placeareasfollows:
*Backandsides 0"
Perpendicularwalls 6"
Floor 0"
Ceilingtolouveropening 42"
Front 36"
TopofStandoffs 0"
Vent (Seeventinginstructionsfor
specicventingclearances.)
Combustiblematerialwithamaximumthick-
nessof5/8"maybeushwiththetopfrontof
replace.
*Forbackandsidesofreplace,donotpack
withinsulationorothermaterials.Zeroinch
clearancetocombustiblematerialsareforfram-
ingpurposeonly.
21
1
/8" (36")
23
1
/4" (42")