


www.desatech.com
118197-01C 9
VENTINg INSTALLATION
INSTRUCTIONS
Continued
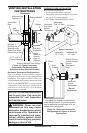
WARNING: Do not recess
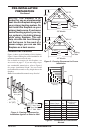
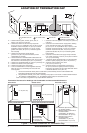
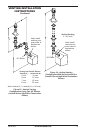
6. Positionthe
horizontalventcapinthecenterofthe8
1
/
2
"
roundholeandattachtotheexteriorwallwith
fourwoodscrewsprovided.Beforeattaching
theventcaptoexteriorwall,runabeadof
non-hardeningmastic(pliablesealant)around
theoutsideedgestomakeasealbetweenitand
theoutsidewall.Note:Thefourwoodscrews
providedshouldbereplacedwithappropriate
fastenersforstucco,brick,concreteorother
typesofsidings.
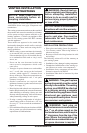
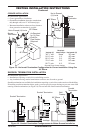
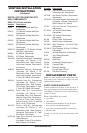
Forvinylsiding,
stuccoorwoodexteriors,asidingstandoffmay
beinstalledbetweentheventcapandexterior
wall.Thesidingstandoffpreventsexcessive
heatfromdamagingthesidingmaterials.
Sidingmaterialmustbecuttoaccommodate
standoff.Bolttheventcaptothestandoff.Ap-
plynon-hardeningmasticaroundoutsideedge
ofstandoff.Positionthestandoff/capassembly
inthecenterofthe10
3
/
4
"squareholeandattach
toexteriorwallwithwoodscrewsprovided(see
Figure11).Thesidingstandoffmustsitush
againsttheexteriorfasciamaterial.
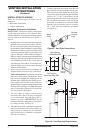
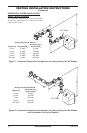
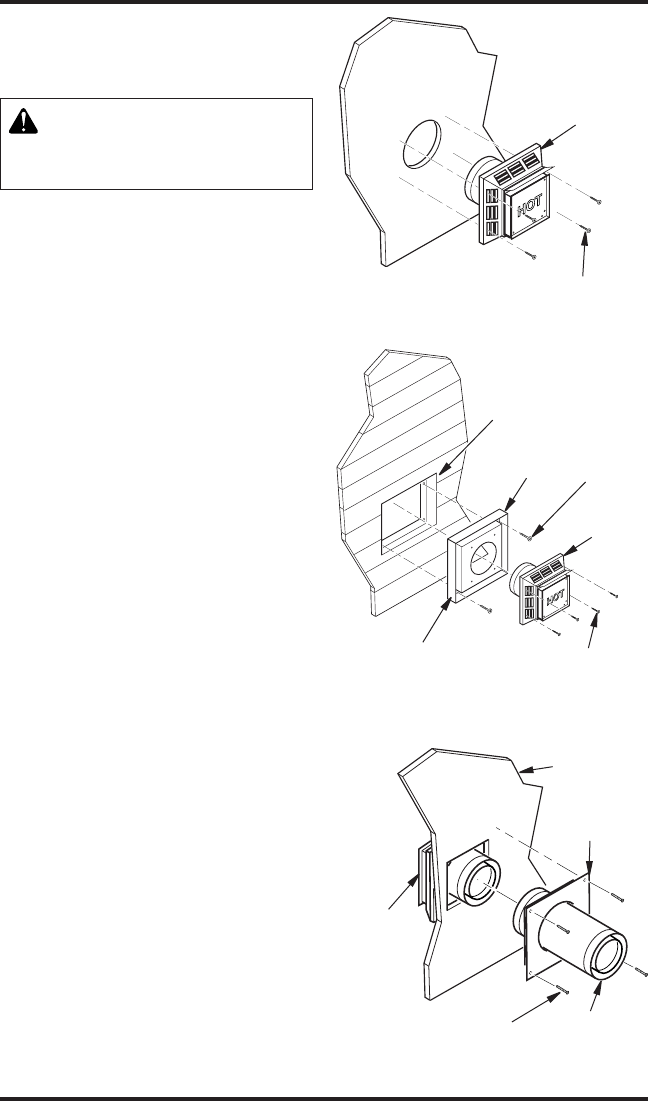
7. Slidethewall
restopovertheventpipebeforeconnecting
horizontalruntoventcap(seeFigure12).
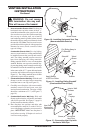
8. Carefullymovereplace,withventassembly
attached,towardwallandinsertventpipe
intohorizontaltermination.Thepipeoverlap
shouldbeaminimumof1
1
/
4
"(seeFigure13,
page10).
9. Slidewall
restopagainstinteriorwallsurfaceandattach
withscrewsprovided.SeeFigure13,page10,
forhorizontalterminationdetails.
10.Placereplaceintopositionandshimwith
noncombustiblematerialifneeded.Nailor
screwsideangestoframingtosecureunitin
place.IMPORTANT:Makesurereplaceis
levelbeforesecuring.Ifreplaceisnotlevel
itwillnotworkproperly.
Figure 10 - Installing Horizontal Vent Cap
(Noncombustible Exterior)
Wood Screw
Vent Cap
Figure 11 - Installing Siding Standoff
(Combustible Exterior Wall)
Cut Siding Away to
Fit Standoff
Wood
Screw
Screws
Standoff
Vent
Cap
Apply Mastic
to All Four Sides
Vent Cap
(Horizontal
Termination)
Interior Wall
Surface
Wall
Firestop
Horizontal
Vent Pipe
Figure 12 - Connecting Vent Cap with
Horizontal Vent Pipe
Screw