


4-13
Component Teardown
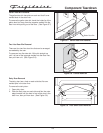
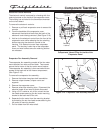
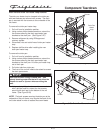
Drain Pan and Drain Pan Heater Loop Removal
The drain pan heater loop is clamped to the drain pan
with two brackets and secured with screws. The drain
pan is secured with four screws to the underside of the
unit frame.
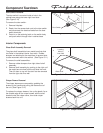
To remove the drain pan heater loop:
1. Pull unit from its installation position.
2. Using a short phillips head screwdriver, extract the
four screws securing the drain pan heater loop
brackets to the drain pan. (See Figure 5-27)
3. Recover refrigerant by using EPA approved
recovery system.
4. Disconnect inlet and outlet lines of drain pan heater
loop.
5. Replace old filter-drier after installing the new
drain pan heater loop.
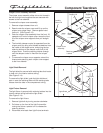
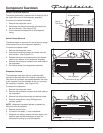
To remove the drain pan:
1. Pull unit from its installation position.
2. Using a short phillips head screwdriver, extract the
four screws securing the drain pan heater loop
brackets to the drain pan. Lift drain pan heater loop
out of drain pan.
3. Pull drain tube from drain pan.
4. The front of the unit will need to be raised to access
the drain pan screws.
4. Using a short phillips head screwdriver, or socket
with a phillips head bit, extract the four screws
securing the drain pan to the bottom of the unit
frame. (See Figure 5-28)
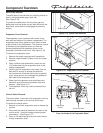
NOTE: The back screws securing the drain pan to the
underside of the unit frame, may require the back of the
unit to be raised in order to access the screw heads.
Figure 5-27. Drain Pan Heater Loop Removal
Figure 5-28. Drain Pan Removal
Brackets
Drain Pan
Screws
Drain Pan
Heater
Loop
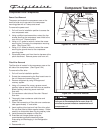
Use caution when tilting a freezer unit. Use
sturdy blocking materials that will not allow the
freezer to rock or tip over when servicing the
unit.
Screws
Screws